
Best WooCommerce Tools to Buy in June 2026
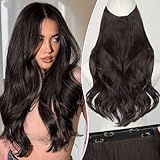
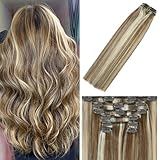
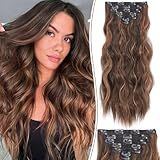
PHADRIA Invisible Wire Hair Extensions Layered Long Wavy Darck Brown Hairpiece for Women Transparent Wire Adjustable Size 6 Secure Clips Invisible Headband Hair Extension 20 Inch
- ACHIEVE INSTANT VOLUME AND LENGTH WITH ULTRA-COMFORTABLE EXTENSIONS.
- ADJUSTABLE SIZES ENSURE A PERFECT FIT FOR ANY HAIR TYPE OR STYLE.
- NO DAMAGE, NO GLUE-EASY APPLICATION LETS YOU SHINE IN MINUTES!


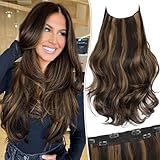
KooKaStyle Invisible Wire Hair Extensions Long Straight Layered Synthetic with Transparent Wire Adjustable Size 6 Secure Clips Hairpieces for Women 20 Inch (20 Inch, Balayage Dark Brown to Chestnut)
- INSTANT VOLUME & LENGTH: ACHIEVE SALON-QUALITY HAIR IN SECONDS!
- USER-FRIENDLY DESIGN: SECURE CLIPS ENSURE A NATURAL, FLUFFY LOOK.
- EFFORTLESS APPLICATION: THREE SIMPLE STEPS FOR STUNNING LAYERED STYLES.
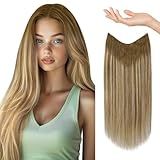
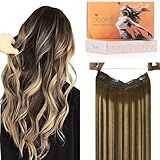
Sunny Wire Hair Extensions Real Human Hair Fish Line Human Hair Extensions Invisible Wire Extensions Light Brown to Platinum Blonde with Brown Highlights #6/60/6 14 Inch
-
REAL HUMAN HAIR: SEAMLESSLY BLENDS FOR A NATURAL, SOFT FINISH.
-
QUICK & EASY APPLICATION: CLIP ON IN UNDER 10 MINUTES-NO SALON NEEDED!
-
VERSATILE STYLING: HEAT-FRIENDLY IN 18+ COLORS FOR ANY OCCASION.
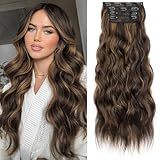
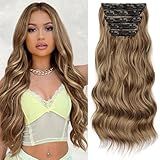
KooKaStyle Clip in Hair Extensions Long Wavy 4PCS Thick Hairpieces Synthetic Highlight Hair Extensions Balayage Dark Brown to Chestnut H2/426 Fiber Double Weft Natural 24Inch for Women
- 🌸 ACHIEVE FULLER HAIR EASILY WITH 190G OF LUXURIOUS EXTENSIONS!
- 💖 ENJOY A COMFORTABLE FIT WITH SECURE, NON-SLIP STAINLESS STEEL CLIPS!
- 💌 KEEP EXTENSIONS TANGLE-FREE WITH OUR EASY CARE TIPS FOR LONGEVITY!
WindTouch Clip in Hair Extensions Human Hair Balayage Medium Light Brown to Blonde Hair Extensions for Blonde 12Inch 75g #6p613 7PCS Gift for Women
-
100% HUMAN HAIR FOR A SOFT, NATURAL LOOK AND FEEL.
-
LIGHTWEIGHT CLIPS ENSURE COMFORT AND A SECURE FIT ALL DAY.
-
30-DAY MONEY-BACK GUARANTEE FOR HASSLE-FREE SHOPPING!
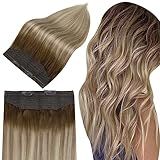
DOORES Wire Hair Extensions 14 Inch 75g Remy Human Wire Hair Extensions Invisible Transparent Line Adjustable Hairpieces Secret Extensions Straight Hair Balayage Chocolate Brown to Caramel Blonde
-
SALON-QUALITY 100% HUMAN HAIR: TANGLE-FREE, SOFT & VERSATILE!
-
INSTALL IN 5 MINUTES: QUICK, EASY, PERFECT FOR BUSY LIFESTYLES!
-
SECURE & STABLE FIT: DOUBLE FIXED WITH WIRE & CLIPS FOR CONFIDENCE!
Full Shine Wire Hair Extensions Walnut Brown to Light Brown Mix Light Blonde 70g Balayage Hair Extensions Invisible Wire Hair Extension with Transparent Fishing Line Short Straight Hairpiece 12 Inch
- SEAMLESS BLEND: INSTANTLY ADD VOLUME & LENGTH WITH HUMAN HAIR!
- EFFORTLESS APPLICATION: TRANSFORM YOUR LOOK IN MINUTES WITH EASE!
- HEAT-FRIENDLY STYLING: CREATE CURLS OR SLEEK LOOKS LIKE A PRO!
KooKaStyle Hair Extensions 5PCS Long Wavy Upgrate Invisible Full Coverage Edges Seamless Clip in Extensions for Women 20 Inch Honey Blonde Mix Brown Synthetic Natural Hairpieces
- 🌸 UPGRADED EDGE TECH FOR INVISIBLE, SEAMLESS INTEGRATION IN HAIR.
- 💕 INSTANTLY BOOST HAIR VOLUME WITH VERSATILE WEFT SIZE OPTIONS.
- 💖 ACHIEVE LONG, STUNNING HAIR IN MINUTES WITHOUT SALON VISITS!
KooKaStyle Hair Extensions, 7PCS Clip in Hair Extension, 20 Inch Auburn Mix Chestnut Long Wavy Natural Soft Thick Hairpieces for Women
-
INSTANT GLAM: ACHIEVE BEAUTIFUL, LONG WAVY HAIR EFFORTLESSLY!
-
LUXURIOUS FEEL: LIGHTWEIGHT SYNTHETIC FIBERS FOR A NATURAL TOUCH.
-
PERFECT GIFT: IDEAL FOR ANY OCCASION; DELIGHT FRIENDS AND FAMILY!
To add product variations in WooCommerce, such as size and color options, you can follow these steps:
- Login to your WordPress admin dashboard.
- Go to the WooCommerce tab in the left menu and click on "Products."
- Either create a new product or edit an existing one.
- Under the "Product Data" section, select the "Variable Product" option from the dropdown.
- After selecting "Variable Product," a new tab called "Variations" will appear.
- Click on the "Variations" tab, and then select "Add Variation" from the dropdown.
- Choose the type of variation you want to add, like color or size.
- Enter the specific attributes for each variation, such as different sizes and their prices.
- Customize any additional settings for each variation, like SKU or stock levels.
- Add as many variations as needed by repeating steps 6-9.
- Save/update the product.
By following these steps, you can easily add product variations in WooCommerce and provide your customers with options like size, color, or any other attribute you desire.
How to show product variations on the shop page in WooCommerce?
To show product variations on the shop page in WooCommerce, you can follow these steps:
- Login to your WordPress Admin Dashboard.
- Navigate to the Appearance section and click on Customize.
- In the Customizer, select the WooCommerce option.
- Choose the Product Catalog tab.
- In the Product Catalog tab, find the "Shop page display" option and select "Show products: Show variations as individual products".
- Save the changes made in the Customizer.
Once you have completed these steps, the product variations will be displayed as individual products on the shop page in WooCommerce. Each variation will have its own listing with its unique price, attributes, and options.
What is a variable product in WooCommerce?
A variable product in WooCommerce is a type of product that offers multiple options or variations for customers to choose from. It allows you to create a single product listing with different attributes such as size, color, or material, and set unique prices, stock levels, and images for each variation. This way, customers can select the specific variation they want before adding the product to their cart. Variable products are commonly used for items with customizable options or different variations, such as clothing, furniture, or electronics.
How to manage stock for product variations in WooCommerce?
To manage stock for product variations in WooCommerce, you can follow these steps:
- Set up product variations: In your WooCommerce dashboard, go to Products > Add New. Choose the product type as "Variable Product" and add attributes that define the variations (e.g., size, color). Save the changes.
- Manage stock for each variation: Under the "Attributes" tab, click on "Variations" and select "Create variations from all attributes." This will generate variations based on the attributes you defined earlier. Expand each variation and set the stock quantity and other options like SKU, price, etc.
- Enable stock management: Under the "Inventory" tab, ensure that the "Manage stock?" option is checked for the parent variable product. This allows you to track and manage stock for each variation.
- Set stock status and low stock thresholds: In the "Inventory" tab, you can specify the stock status (in stock, out of stock) and set a low stock threshold to receive notifications when the stock quantity goes below that number.
- Track stock and replenish when needed: WooCommerce will automatically update the stock quantity for each variation based on orders placed. To manage stock, go to Products > Stocks. Here, you can see a summary of stock quantities and make adjustments manually if needed.
- Enable backorders (optional): If you allow backorders, customers can still purchase variations even if the stock is temporarily depleted. You can enable backorders under the "Inventory" tab and choose the desired option (e.g., allow, allow but notify).
By following these steps, you can effectively manage stock for product variations in WooCommerce and ensure that your inventory is always up-to-date.
How to add images for different product variations in WooCommerce?
To add images for different product variations in WooCommerce, you can follow these steps:
- Go to the WordPress dashboard and navigate to "Products" -> "All Products".
- Select the product that has variations for which you want to add images.
- Once on the product editing page, scroll down to the "Product Data" section, and click on the "Variations" tab.
- If variations haven't been created yet, you can add them by selecting "Create variations from all attributes" from the dropdown menu and clicking on the "Go" button.
- You will now see the list of variations. Click on the one you want to add images to.
- Scroll down to the "Product Gallery" section, and click on the "Add product gallery images" button.
- A media uploader popup will appear. You can either upload new images or select existing ones from your media library.
- After selecting images, click on the "Add to gallery" button.
- Rearrange the images if needed by dragging and dropping them into the desired order.
- Finally, click on the "Update" or "Publish" button to save your changes.
Now, when customers select different variations on the product page, the images you added will be displayed accordingly.
How to control inventory for different variations of a product in WooCommerce?
To control inventory for different variations of a product in WooCommerce, you can follow these steps:
- Add a Variable Product: In your WooCommerce dashboard, create a variable product. A variable product is one that has different variations, such as different colors, sizes, or other attributes.
- Define Attributes: Under the "Attributes" tab for the variable product, define the attributes for the variations. For example, if your product has different sizes, you can create a size attribute and specify the different sizes as options.
- Create Variations: Under the "Variations" tab, create individual variations for each combination of attributes. For example, if you have a size attribute and a color attribute, you would create separate variations for each size and color combination.
- Set Prices and Inventory: In each variation, you can set specific prices and inventory quantities. You can define the regular price, sale price (if applicable), and manage the stock for each variation individually. Enable the "Manage stock?" option to control inventory.
- Stock Management Options: WooCommerce offers different stock management options such as "Manage stock" (to enable stock management), "Stock status" (to indicate whether the product is in stock or out of stock), and "Stock quantity" (to specify the quantity available). Ensure these options are set correctly for each variation.
- Enable Notifications: If needed, you can enable stock notifications to receive alerts when stock reaches a specific threshold. This helps you proactively manage inventory and avoid stockouts.
- Save Changes: After configuring attributes, variations, prices, and inventory quantities for each variation, save the changes.
By following these steps, you can effectively control inventory for different variations of a product in WooCommerce and maintain accurate stock levels.