
Best Ember.js Development Tools to Buy in June 2026
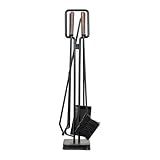
Modern Ember Levi 5 Piece Fireplace Tool Set in Black with Walnut Wood Handles | Includes Brush, Shovel, Fire Poker, Tongs, and Stand | Heavy-Duty Steel | Heat-Resistant Powder Coating
-
COMPLETE 5-PIECE SET FOR ALL YOUR FIREPLACE NEEDS IN ONE PACKAGE.
-
HEAVY-DUTY STEEL CONSTRUCTION ENSURES DURABILITY AND LONG-LASTING USE.
-
STYLISH DESIGN COMPLEMENTS BOTH TRADITIONAL AND MODERN HOME DÉCOR.


Modern Ember Cascade 5 Piece Fireplace Tool Set in Black | Includes Brush, Shovel, Fire Poker, Tongs, and Stand | Heavy Guage, Coated Steel | Heat-Resistant Plating | Sleek Rounded Handles
- COMPREHENSIVE 5-PIECE SET FOR ALL YOUR FIREPLACE NEEDS.
- DURABLE STEEL CONSTRUCTION ENSURES LONG-LASTING USE.
- STYLISH DESIGN COMPLEMENTS ANY HOME DECOR EFFORTLESSLY.
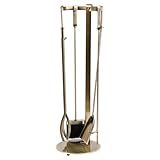
Modern Ember Knoll Fireplace Tool Set in Aged Brass - Includes Brush, Shovel, Fire Poker, Tongs, and Stand - Steel Construction
- AGED BRASS FINISH ENHANCES ANY MODERN OR CONTEMPORARY DECOR.
- HEAVY-DUTY STEEL ENSURES DURABILITY AND LONG-LASTING USE.
- SIMPLE SETUP IN MINUTES FOR IMMEDIATE FIREPLACE ENJOYMENT.

Ember's Hollow
In Ember.js, you can catch global keypress events by adding event listeners to the window or document objects. This allows you to listen for keypress events anywhere in your Ember application, not just within specific components or routes.
To catch global keypress events, you can create a service or mixin that adds event listeners to the window or document objects. In this event listener, you can check for specific keycodes or key combinations to trigger specific actions in your Ember application.
For example, you can listen for the "keypress" event and check if the keycode matches the Enter key (keycode 13) to trigger a specific action, such as submitting a form or navigating to a different route.
By adding global keypress event listeners in your Ember application, you can create keyboard shortcuts or improve the overall user experience by allowing users to navigate and interact with your application using keyboard inputs.
How to use event listeners for keypress events in ember.js?
In Ember.js, you can use the keydown or keypress event listeners to detect keypress events on particular elements. Here's an example of how you can use event listeners for keypress events in Ember.js:
- In your Ember component or controller, define a key press event listener function:
import Component from '@ember/component';
export default Component.extend({ init() { this._super(...arguments);
// Add event listener for key press events
window.addEventListener('keypress', this.handleKeyPress.bind(this));
},
willDestroyElement() { this._super(...arguments);
// Remove the event listener when the component is destroyed
window.removeEventListener('keypress', this.handleKeyPress.bind(this));
},
handleKeyPress(event) { // Handle the key press event here console.log('Key pressed:', event.key); } });
- In the template file associated with your component, add a reference to the component and specify the element that you want to listen for keypress events on:
{{!-- my-component.hbs --}}
- Finally, define the handleKeyPress action in your component's JavaScript file to handle the key press event:
import Component from '@ember/component';
export default Component.extend({ actions: { handleKeyPress(event) { // Handle the key press event here console.log('Key pressed:', event.key); } } });
With these steps, you should now be able to use event listeners for key press events in your Ember.js application.
What is the keypress event propagation path in ember.js?
In Ember.js, the keypress event propagation path starts with the targeted element where the keypress event occurs. The event then bubbles up through the DOM hierarchy, triggering event handlers in each parent element before reaching the top-most element. Along this propagation path, Ember.js checks if any components or controllers have event handlers defined for the keypress event and invokes them accordingly. The event can also be explicitly stopped from propagating further by calling event.stopPropagation() in the event handler.
How to dynamically attach keypress event handlers in ember.js?
In Ember.js, you can dynamically attach keypress event handlers by using the {{action}} helper in your Ember template. Here's an example of how you can achieve this:
- Define the action method in your controller or component:
actions: { handleKeyPress(key) { // Handle the keypress event here console.log(`Key pressed: ${key}`); } }
- In your template, attach the keypress event handler using the {{action}} helper:
<input type="text" {{action "handleKeyPress" "Enter" on="keypress"}}>
In this example, the handleKeyPress action method in your controller or component will be called whenever the Enter key is pressed in the text input field.
You can also pass dynamic values to the handleKeyPress action method by using the {{action}} helper with the {{bind}} helper. For example:
{{#each key in keys}} <input type="text" {{action (action "handleKeyPress" key) on="keypress"}}> {{/each}}
In this example, the handleKeyPress action method will receive the key value as an argument when the corresponding input field triggers the keypress event.
By using the {{action}} helper with dynamic values, you can attach keypress event handlers dynamically in your Ember.js application.
What is the key property of keypress events in ember.js?
The key property of keypress events in Ember.js is used to determine the specific key that was pressed on the keyboard. It provides the code of the key that was pressed, such as the ASCII value or the Unicode value. This property is often used in handling user input and performing actions based on the key pressed by the user.
How to debug keypress event handling in ember.js?
To debug keypress event handling in Ember.js, you can follow these steps:
- Use console.log statements: Insert console.log statements in your keypress event handling function to print out the status of variables and events as they are triggered.
- Use Ember Inspector: The Ember Inspector tool is a browser extension that allows you to inspect your Ember application's components, views, routes, and more. You can use it to debug keypress event handling by inspecting the state of your Ember application as the events are triggered.
- Use breakpoints: You can set breakpoints in your keypress event handling function using the browser's developer tools. This will allow you to pause the execution of your code at specific points and inspect the state of variables and events.
- Use Ember’s built-in debugging tools: Ember.js provides several debugging tools that can help you troubleshoot issues with event handling. You can use Ember.Logger for logging messages to the console, Ember.Instrumentation for measuring performance, and Ember.assert for checking assumptions in your code.
- Use Ember's event dispatcher: You can use Ember's event dispatcher to listen for keypress events and handle them in a more organized manner. By defining event listeners in your Ember controllers or components, you can centralize your event handling logic and make it easier to debug.
By following these steps, you should be able to effectively debug keypress event handling in your Ember.js application.
What is key event delegation in ember.js?
Key event delegation in Ember.js is the ability to handle events on a parent element, rather than on each individual child element. This can help reduce the number of event listeners needed in an application and improve performance.
In Ember.js, key event delegation is achieved using the action helper in template files. By attaching event handlers to parent elements and using the action helper to trigger specific actions based on the target of the event, developers can create more efficient and maintainable event handling in their applications.
Key event delegation allows developers to centralize event handling logic in Ember.js applications, making it easier to manage and update event behavior across multiple components. By delegating events to parent elements, developers can minimize the number of event listeners and improve the overall performance of their applications.