
Best Svelte Development Tools to Buy in June 2026

Full-Stack Web Development with TypeScript 5: Craft modern full-stack projects with Bun, PostgreSQL, Svelte, TypeScript, and OpenAI


Hands-On JavaScript High Performance: Build faster web apps using Node.js, Svelte.js, and WebAssembly

CRKT Minimalist Bowie Neck : Compact Fixed Blade Knife, Folts Utility with Bead Blast Blade, Resin Infused Fiber Handle, and Sheath 2387
- EFFORTLESS SHARPENING WITH HIGH CARBON STAINLESS STEEL BLADE.
- REDUCED GLARE WITH BEAD BLAST FINISH FOR STEALTHY USE.
- DURABLE, STYLISH HANDLE AND VERSATILE MOUNTING OPTIONS INCLUDED.
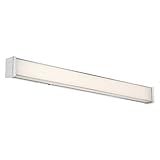
WAC Lighting dweLED, Svelte 34in LED Bathroom Vanity or Wall Light 2700K in Chrome
- SLEEK 3-INCH DESIGN FITS ANY DÉCOR, ENHANCING AESTHETIC APPEAL.
- VERSATILE MOUNTING OPTIONS WITH INCLUDED CONVERSION PLATE FOR CONVENIENCE.
- LONG-LASTING 80,000 HOURS AND SMOOTH DIMMING FOR ULTIMATE FLEXIBILITY.

JavaScript Frameworks for Modern Web Development: The Essential Frameworks, Libraries, and Tools to Learn Right Now
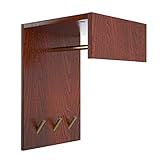
Perfecasa Svelte Solid Wood Floating Mini Floating Closet, Coat Rack, Space Saving Wall Mounted, Creative Corner, Entryway, Foyer Hallway, Easy KD parts(Classic Cherry)
-
MAXIMIZE SMALL SPACES WITH OUR VERSATILE COAT RACK DESIGN.
-
HANG CLOTHES AND STORE ITEMS ALL IN ONE STYLISH SOLUTION.
-
QUICK INSTALL WITH NO DRILLING OR MEASURING NEEDED!

PRESTIGE Paints Exterior Paint and Primer In One, 1-Gallon, Semi-Gloss, Comparable Match of Sherwin Williams* Svelte Sage*
- COMPARABLE COLORS USING CUTTING-EDGE TECHNOLOGY FOR PRECISION.
- WEATHER, FADE, AND STAIN-RESISTANT FOR LASTING QUALITY.
- LOW VOC FORMULA ENSURES A HEALTHIER HOME ENVIRONMENT.
To create a basic Svelte component, you need to follow these steps:
- Set up a new Svelte project or navigate to an existing project directory.
- Identify the purpose of your component and decide on its structure, functionality, and styling.
- Create a new Svelte component file with the .svelte extension, e.g., MyComponent.svelte.
- Define the component's markup structure within the tags of the .svelte file. Use HTML-like syntax to define the structure.
- Define any variables or props that your component needs within the section. Use the "let" keyword to declare variables.
- Implement the desired functionality of your component by adding JavaScript code within the tags.
- Bind data properties or functions to your component's markup structure using curly braces {{ }}. Use the "@" symbol for event binding.
- Define any CSS styles specific to your component within the tags of the .svelte file.
- Export your component using the "export" keyword at the end of the .svelte file, e.g., export default MyComponent.
- Use the created component in your application by importing it into another Svelte file and incorporating it in the desired location.
Remember to install and set up the necessary dependencies and build tools for your Svelte project before creating components.
What is reactive data in Svelte components?
Reactive data in Svelte components refers to the data that automatically updates the DOM whenever its value changes. In Svelte, you can define reactive data using the let keyword within a component. When the value of reactive data changes, Svelte automatically re-renders the relevant part of the DOM to reflect the new value.
For example, consider a simple Svelte component that displays a counter:
Click to increment
Here, count is a reactive data variable because it is declared using the let keyword. Whenever the increment() function is called, the count variable is updated, and Svelte automatically updates the DOM to reflect the new value of count in the paragraph element.
Reactive data makes it easier to manage the state of a component and ensures that the component's UI is always in sync with the underlying data.
What is the role of props in Svelte components?
The role of props in Svelte components is to pass data from a parent component to a child component. Props allow the parent component to communicate and share data with its child components.
In Svelte, props are declared in the child component's script and can be accessed in the component's markup. They can be used to customize and configure the child component behavior, appearance, or functionality based on the data provided by the parent component.
Props are immutable, meaning they cannot be modified directly within the child component. Instead, if the child component needs to modify the data, it can emit events to the parent component requesting a change, and the parent component can update the prop accordingly.
Overall, props in Svelte components facilitate the flow of data and communication between parent and child components, allowing for reusable and customizable components.
How to define CSS transitions in Svelte components?
To define CSS transitions in Svelte components, you can use the transition directive provided by Svelte. Here's how you can define CSS transitions in a Svelte component:
-
Import the t function from the svelte/transition module at the top of your component file. import { t } from 'svelte/transition';
-
**Add the in directive to the HTML element where you want to apply the transition. This directive is used to control the presence or absence of an element in the DOM.
:fade>
Here, the fade transition will be triggered when the element is added or removed from the DOM.**
-
Define the CSS styles for the transition using the t function within the The fade function is a transition function that takes the HTML element and an options object as parameters. It returns an object containing delay, duration, and css properties. The css property is a function that takes the progress t and duration u as parameters and returns the CSS styles for the transition.
-
**Apply the transition function to the element using the in directive.
:fade="{{ delay: 0, duration: 0.3 }}">
Here, the fade transition function is applied to the element with a delay of 0 and a duration of 0.3 seconds.**
You can define multiple transitions in the <script> tag and apply them to different elements in your component using the transition directive.