
Best Form Handling Solutions in Svelte to Buy in June 2026
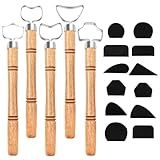
GeryVtee 5 PCS Pottery Mug Handle Tool with 12PCS Pottery Carving Tools Pottery Handle Maker Clay Extruder Tool Clay Handle Extruder Tool for Teacup Mug Cup Handle Making
-
VERSATILE 5-TOOL SET WITH 12 HANDLE SHAPES FOR DIVERSE POTTERY PROJECTS.
-
DURABLE WOOD, STAINLESS STEEL, AND FOAM ENSURE LONG-LASTING PERFORMANCE.
-
ERGONOMIC DESIGN MINIMIZES FATIGUE FOR COMFORTABLE, EXTENDED USE.


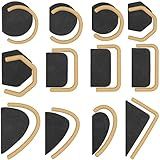
Antrader Mug Handle Forms Pottery Mug Handle Molds Small Clay Pottery Mug Handle Forms Ceramic Mug Handle Molds for Clay, Various Sizes and Shapes,12Pcs
- CREATE UNIQUE MUG HANDLES WITH 12 VERSATILE MOLDS IN VARIOUS SHAPES.
- DURABLE EVA MATERIAL ENSURES LONG-LASTING USE WITHOUT DEFORMATION.
- PERFECT FOR BEGINNERS AND PROS: EASY TO SHAPE AND CLEAN AFTER USE!
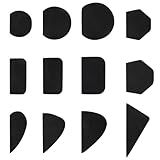
Pottery Mug Handle Molds 12Pcs Mug Handle Forms Mug Handle Making Tool for Pottery Ceramic Mug Handle Molds for Clay with Various Shapes and Sizes-Black
- VERSATILE DESIGNS: 12 UNIQUE MOLDS FOR DIVERSE MUG HANDLE STYLES!
- DURABLE MATERIAL: HIGH-QUALITY SPONGE ENSURES LONG-LASTING USE!
- USER-FRIENDLY: EFFORTLESS SHAPING FOR ALL SKILL LEVELS-EASY & QUICK!
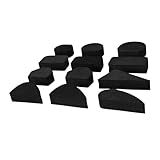
bociloy 12Pcs Mug Handle Forms, Pottery Mug Handle Molds for Clay, Various Sizes and Shapes, Ceramic Mug Handle Making Tool for DIY Coffee Cups and Pottery Projects
-
12 UNIQUE DESIGNS FOR ENDLESS CREATIVITY IN POTTERY PROJECTS!
-
DURABLE EVA MATERIAL ENSURES LONG-LASTING, RELIABLE MOLDING.
-
EASY TO CLEAN & STORE: HASSLE-FREE CRAFTING EXPERIENCE!
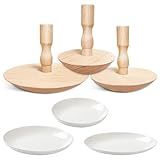
GeryVtee 3 Pack Pottery Molds for Handbuilding 4.5" 5.5" 6.5" Thickness 2.5'' Plaster Molds Wood Pottery Tools with Handle for Ceramic Top Forms DIY Bowls Plate Dish Slump Press Art Making
- VERSATILE SIZES: THREE MOLD SIZES FOR ENDLESS POTTERY CREATIVITY.
- DURABLE WOOD: LIGHTWEIGHT BEECH WOOD ENSURES LONG-LASTING USE.
- USER-FRIENDLY: DETACHABLE HANDLE FOR PRECISE AND EASY MOLDING.
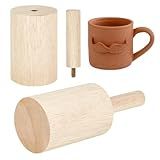
BENECREAT 8.6x3 inch Cup Pottery Molds, Wood Pottery Tools with Handle Pottery Molds Set for Clay Pottery Rib Wooden Shaping Porcelain Cup
- DURABLE WOOD MOLD FOR PROFESSIONAL-QUALITY CERAMIC FINISHES!
- EFFORTLESSLY CREATE PERFECT SHAPES FOR MUGS AND VASES.
- REUSABLE DESIGN ENSURES LONGEVITY AND EASY MAINTENANCE.
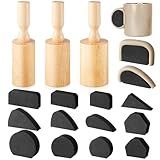
Juexica 3 Pcs Cup Pottery Molds 2.5'', 2.8'', 3.1'' with 12 Pcs Mug Handle Forms Shaping Tool Wood Slump Press 3 Sizes Clay Molds for DIY Cup Mug Art Making
- VERSATILE MOLDS: CREATE 3 DIFFERENT MUG SIZES FOR ALL YOUR NEEDS!
- DURABLE AND EASY TO CLEAN: QUALITY MATERIALS FOR LONG-LASTING USE!
- PERFECT FOR EVERYONE: IDEAL FOR BEGINNERS AND SEASONED POTTERY LOVERS!

WANJAO Tool Dip Rubber Coating, Plastic Dip Matte Liquid Rubber dip Flexible Peelable Protective Tool Handle dip Coating with Brush for Pliers and Jewelry Tools DIY Craft, 150g Blue
-
FLEXIBLE PROTECTION: PEELABLE RUBBER COATING SHIELDS SURFACES FROM SCRATCHES.
-
ENHANCED GRIP: RUBBERIZED LAYER ENSURES FIRM HANDLING, PREVENTS SLIPS.
-
SIMPLE APPLICATION: EASY TO APPLY AND REMOVE WITHOUT ANY DAMAGE.
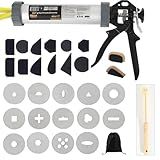
Griiyakii Clay Extruder Tool - Handheld Clay Gun with 14 Plates for Sculpting and Crafting, Includes 12 Pcs Mug Handle Forms Pottery Shaping Tool Kit
-
COMPLETE SET INCLUDES TOOLS FOR DIVERSE CLAY SHAPES AND MUG HANDLES.
-
DURABLE ALUMINUM DESIGN ENSURES PRECISION AND WITHSTANDS HIGH PRESSURE.
-
EASY CLEANING KEEPS TOOLS READY FOR CREATIVITY AND CONSISTENT USE.
Handling form submissions and validations in Svelte involves a few key steps:
- Start by setting up the form structure in your Svelte component. Define form input fields using the element or other relevant form elements such as or . Bind these input fields to a component variable using the bind: directive, allowing you to manipulate their values in the component's JavaScript code.
- Utilize the on:submit event to handle form submissions. Add this event to the tag and bind it to a method in your component. This method will be responsible for handling form submissions, which you can define based on your application's requirements.
- Inside the form submission method, you can access the form input values using the bound variables. Perform any necessary validations on the input values to ensure they meet the desired criteria or format. For example, you can check if required fields are filled, check for valid email addresses, or validate numeric inputs.
- If the form input values do not pass the validation criteria, you can display error messages to the user and prevent the form from being submitted. Svelte allows you to conditionally render elements based on certain conditions, so you can show error messages or highlight invalid fields accordingly.
- If the form input values pass the validation criteria, you can proceed with further processing, such as sending the form data to an API, updating the application state, or performing any other required actions. You can handle this within the form submission method, calling relevant functions or making appropriate API requests.
- Additionally, it's good practice to perform real-time or inline form validation to help users correct any mistakes before submitting the form. You can achieve this by using event bindings such as on:input or the bind: directive on individual form fields to trigger validation logic on each input change.
Overall, Svelte provides a straightforward approach to handle form submissions and validations within your components. By utilizing its reactive capabilities and event system, you can easily validate form input values, display error messages, and carry out the required actions based on the form's submission.
What is form validation in Svelte?
Form validation in Svelte refers to the process of ensuring that the data entered into a form matches the required format or meets certain criteria. It involves checking input values for errors, displaying error messages, and preventing the form from being submitted if there are any invalid inputs.
Svelte provides various ways to perform form validation, including:
- Built-in HTML validation attributes: Svelte supports HTML's built-in form validation attributes such as required, pattern, min, max, etc. These attributes can be added directly to input fields to enforce basic validation rules.
- Custom validation logic: Svelte allows you to define custom validation logic using JavaScript. You can attach event handlers to form inputs and check the input values against specific conditions. If the validation fails, you can display error messages and prevent the form from submitting.
- Third-party libraries: Svelte can also work well with third-party form validation libraries like Yup, Joi, or Formik, which provide advanced validation capabilities, including validating complex data structures, asynchronous validation, and more.
By implementing form validation in Svelte, you can improve the user experience by ensuring that users provide valid data and help prevent errors or unwanted behavior in your applications.
What are the different form input types supported in Svelte?
Svelte supports various form input types, including:
- Text: - It allows users to enter a single-line text.
- Password: - It hides the input characters, typically used for passwords.
- Number: - It limits input to numeric values only.
- Email: - It validates and limits input to email format.
- Date: - It displays a calendar to select a date.
- Time: - It allows users to select a time.
- Checkbox: - It presents a checkbox that can be checked or unchecked.
- Radio: - It presents multiple options out of which only one can be selected.
- Range: - It provides a slider to select a value within a specified range.
- File: - It allows users to upload files from their device.
- Select: - It presents a dropdown menu with multiple options, out of which one can be selected.
- Textarea: - It provides a multi-line text input.
These form input types can be used with Svelte's two-way data binding to handle user input and update component state.
How to handle form data in Svelte?
Handling form data in Svelte involves using the built-in form and input elements, event handling, and component state management. Here are the steps to handle form data in Svelte:
- Create a Svelte component with a form element:
- Add input elements inside the form and bind their values to properties of the formData object. Use the bind:value directive for two-way data binding:
- Set the on:submit event to call a function to handle the form submission. Use event.preventDefault() to prevent the default form submission behavior and handle the data locally.
- Inside the submit handler function, you can access the form data from the formData object. You can log it to the console or perform any other desired actions.
Note: You can also use other form elements like <select> and <textarea> in a similar way to handle their values.
By following these steps, you can handle form data in Svelte and perform actions such as validation, submitting the data to an API, or updating component state based on the form inputs.
What is the significance of form state management in Svelte?
Form state management is significant in Svelte because it allows developers to handle the complex behavior of forms in a more simplified and efficient way. Svelte provides built-in features and techniques for managing form state, which makes it easier to define form inputs, handle user input, and perform validation.
Some of the key benefits and significance of form state management in Svelte include:
- Reactive updates: Svelte's reactive nature ensures that any changes in form inputs are automatically reflected in the underlying form state. This eliminates the need for manual event handling and state updates, making the code more readable and maintainable.
- Validation and error handling: Svelte allows developers to easily integrate validation logic with form state management. It provides mechanisms to perform real-time validation as the user interacts with the form, making it easier to handle errors and provide feedback.
- Two-way data binding: Svelte's two-way data binding simplifies the synchronization between the form state and the form inputs. It automatically keeps the state and inputs in sync, reducing boilerplate code, and making it easier to manage and update form data.
- Reusability and modularity: Svelte's component-based architecture enables developers to encapsulate form state management logic into reusable components. This promotes code modularity, allowing components to be easily reused across different parts of an application, leading to more maintainable and scalable code.
- Improved performance: Svelte's approach to reactive updates and efficient DOM re-rendering ensures optimal performance in form state management. It achieves this by minimizing unnecessary re-renders and efficiently updating only the relevant parts of the DOM, resulting in faster and smoother user interactions.
Overall, form state management in Svelte simplifies the development and management of complex forms, improves code readability, maintainability, and performance, and enhances the overall user experience.