
Best Tools and Resources for PHP Developers to Buy in June 2026
PHP Development Tool Essentials


PHP 8 Objects, Patterns, and Practice: Volume 2: Mastering Essential Development Tools
PHP Cookbook: Modern Code Solutions for Professional Developers
Full Stack Web Development For Beginners: Learn Ecommerce Web Development Using HTML5, CSS3, Bootstrap, JavaScript, MySQL, and PHP
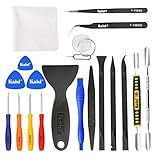
Kaisi Professional Electronics Opening Pry Tool Repair Kit with Metal Spudger Non-Abrasive Nylon Spudgers and Anti-Static Tweezers for Cellphone iPhone Laptops Tablets and More, 20 Piece
- COMPLETE TOOLKIT: 20 ESSENTIAL TOOLS FOR ALL ELECTRONICS REPAIRS.
- DURABLE DESIGN: PROFESSIONAL-GRADE STAINLESS STEEL FOR LONG-LASTING USE.
- BONUS CLEAN-UP: INCLUDES CLEANING CLOTHS FOR A POLISHED FINISH AFTER REPAIR.
PHP: Learn PHP in One Day and Learn It Well. PHP for Beginners with Hands-on Project. (Learn Coding Fast with Hands-On Project Book 6)
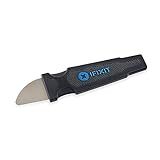
iFixit Jimmy - Ultimate Electronics Prying & Opening Tool
- VERSATILE TOOL: PERFECT FOR TECH DISASSEMBLY AND HOME REPAIR TASKS.
- ERGONOMIC DESIGN: ENSURES PRECISE CONTROL FOR ALL YOUR REPAIR PROJECTS.
- LIFETIME WARRANTY: BUILT TO LAST, BACKED BY IFIXIT'S TRUSTED GUARANTEE.
To install PHPUnit with XAMPP using Composer, you first need to make sure that Composer is installed on your system. Then, you can run the following command in your terminal to install PHPUnit:
composer require --dev phpunit/phpunit
This command will download PHPUnit and its dependencies into your project's vendor directory. After the installation is complete, you can run PHPUnit tests from the command line using the phpunit command.
Make sure to set up the appropriate PHPUnit configuration file for your project, and define your test suites and test cases accordingly. PHPUnit should now be successfully set up with XAMPP using Composer.
How to retrieve PHPUnit dependencies automatically with Composer?
To retrieve PHPUnit dependencies automatically with Composer, follow these steps:
- Make sure you have Composer installed on your system. If not, you can download it from https://getcomposer.org/.
- Create a new project directory for your PHPUnit tests or navigate to an existing project directory.
- Create a composer.json file in your project directory if you don't already have one. This file is used to define the dependencies for your project.
- Add the following code to your composer.json file:
{ "require-dev": { "phpunit/phpunit": "^9" } }
This code specifies that PHPUnit is a development dependency and should be installed in version 9 or higher. You can check the latest version of PHPUnit on https://packagist.org/packages/phpunit/phpunit.
- Save the composer.json file and run the following command in your project directory to install the PHPUnit dependencies:
composer install
Composer will download and install the PHPUnit dependencies specified in the composer.json file.
- Once Composer has finished installing the dependencies, you can run PHPUnit tests by executing the following command:
vendor/bin/phpunit
This command will run the PHPUnit test suite in your project using the PHPUnit executable located in the vendor directory.
By following these steps, you can automatically retrieve PHPUnit dependencies with Composer and easily manage your project's dependencies.
How to run PHPUnit tests in XAMPP environment?
To run PHPUnit tests in XAMPP environment, follow these steps:
- Install PHPUnit: First, you need to install PHPUnit in your XAMPP environment. You can do this by using Composer, a dependency manager for PHP. Run the following command in the terminal to install PHPUnit: composer require --dev phpunit/phpunit
- Write your tests: Create a new directory for your tests, preferably in the root directory of your project. Inside this directory, create test classes that extend PHPUnit\Framework\TestCase and write your test methods.
- Configure the PHPUnit XML file: Create a phpunit.xml configuration file in the root directory of your project. This file should define the directory where your tests are stored and any other configuration settings you need. Here is a basic example of a phpunit.xml file: tests
- Run PHPUnit: Open a terminal window and navigate to the root directory of your project. Run the following command to execute your PHPUnit tests: vendor/bin/phpunit This command will run all the test classes in the specified directory and display the results in the terminal.
- Review the test results: After running the PHPUnit tests, you will see the results displayed in the terminal. You can review the output to see which tests passed, failed, or were skipped.
- Fix any failing tests: If any of your tests fail, you will need to review the code and fix any issues causing the failures. Rerun the PHPUnit tests to verify that the issues have been resolved.
By following these steps, you can run PHPUnit tests in your XAMPP environment and ensure that your PHP code is functioning correctly.
How to troubleshoot common installation issues with PHPUnit?
- Make sure you have installed PHPUnit correctly by following the official installation guide provided on the PHPUnit website. Ensure that you've installed the correct version of PHPUnit that is compatible with your PHP version.
- Check your system requirements to ensure that your operating system and PHP version are compatible with PHPUnit. Make any necessary updates or changes to meet the requirements.
- Verify that your PHPUnit configuration file (phpunit.xml or phpunit.xml.dist) is correctly set up and points to the correct directories and files. Check for any typos or errors in the configuration file.
- Check for any conflicts with other PHP extensions or tools that may be causing issues with PHPUnit. Disable any conflicting extensions or tools and try running PHPUnit again.
- Check for any missing dependencies or required PHP extensions that PHPUnit relies on. Make sure that all necessary dependencies are installed and properly configured.
- Clear your cache and temporary files to remove any possible conflicts or issues that may be causing problems with PHPUnit.
- Update PHPUnit to the latest version to ensure that you are using the most up-to-date and stable release of the testing framework.
- If you are still experiencing issues, check the official PHPUnit documentation and community forums for additional troubleshooting tips and solutions. You can also reach out to the PHPUnit community for help and support.