
Best Tools for Setting Env Variables in Ember.js to Buy in June 2026

Modern Ember Levi 5 Piece Fireplace Tool Set in Black with Walnut Wood Handles | Includes Brush, Shovel, Fire Poker, Tongs, and Stand | Heavy-Duty Steel | Heat-Resistant Powder Coating
- COMPLETE 5-PIECE SET DESIGNED FOR ALL YOUR FIREPLACE NEEDS.
- BUILT TO LAST WITH DURABLE, HEAT-RESISTANT STEEL CONSTRUCTION.
- STYLISH WALNUT HANDLES COMPLEMENT ANY HOME DÉCOR EFFORTLESSLY.


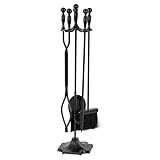
Modern Ember Cascade 5 Piece Fireplace Tool Set in Black | Includes Brush, Shovel, Fire Poker, Tongs, and Stand | Heavy Guage, Coated Steel | Heat-Resistant Plating | Sleek Rounded Handles
- COMPLETE 5-PIECE FIREPLACE TOOL SET FOR ALL YOUR NEEDS!
- BUILT TO LAST: DURABLE STEEL WITHSTANDS HEAT AND CORROSION.
- STYLISH DESIGN MATCHES ANY DECOR WITH NATURAL WOOD ACCENTS.
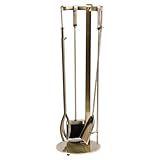
Modern Ember Knoll Fireplace Tool Set in Aged Brass - Includes Brush, Shovel, Fire Poker, Tongs, and Stand - Steel Construction
- ELEGANT AGED BRASS FINISH ENHANCES ANY MODERN DECOR.
- HEAVY-DUTY STEEL ENSURES DURABILITY AND LONG-LASTING USE.
- EASY INSTALLATION ALLOWS FOR QUICK SETUP AND ENJOYMENT.

Ember's Hollow
To set an "env" variable in Ember.js, follow these steps:
- Open your Ember.js project in a code editor.
- Locate the .env file in the root directory of your Ember.js project. If the file does not exist, create a new file and name it .env.
- Inside the .env file, add the variable you want to set in the following format: VARIABLE_NAME=variable_value Replace VARIABLE_NAME with the desired name for your environment variable and variable_value with the actual value you want to assign to it.
- Save the .env file.
- In your Ember.js code, you can access the environment variable using process.env.VARIABLE_NAME.
By setting the "env" variable, you can provide different values for the variable based on different environments (e.g., development, staging, production). This allows you to configure your application differently depending on the environment it is running in.
What is the purpose of using "env" variables for feature flagging in Ember.js?
The purpose of using environment ("env") variables for feature flagging in Ember.js is to allow developers to control the behavior of their application based on different environments or conditions. These variables are often used to enable or disable specific features, run different code paths, or modify configurations based on the current environment.
By utilizing env variables for feature flagging, developers have more flexibility and control over the behavior of their application without the need for continuous code changes or redeployments. It allows for dynamically enabling or disabling features at runtime, providing a mechanism to experiment with new features, A/B testing, or gradually rolling out changes to specific user groups.
Using env variables for feature flagging in Ember.js also helps in maintaining a single codebase that can run on different environments (e.g., development, staging, production) without modifying code.
What are the common pitfalls to avoid when working with "env" variables in Ember.js?
There are several common pitfalls to avoid when working with environment variables in Ember.js:
- Not providing default values: It is crucial to always provide default values for environment variables, as these values will be used in case the variable is not defined.
- Forgetting to set variables in different environments: Each environment (development, production, test) should have its own set of environment variables. It is important to remember to set the appropriate variables for each environment.
- Exposing sensitive information: Environment variables are often used to store sensitive information such as API keys or database credentials. It is important to avoid exposing these values by committing them to version control systems or other public repositories.
- Not updating variables when deploying: When deploying an Ember.js application, it is essential to update the environment variables to match the new deployment environment. Failure to do so can lead to incorrect configurations or broken functionality.
- Not using the correct syntax: When defining environment variables in Ember.js, it is important to use the correct syntax. For example, if using the dotenv library to load variables from a .env file, make sure the correct syntax is used to assign and access the variables.
- Not restarting the server after making changes: Whenever changes are made to environment variables, it is necessary to restart the server for the changes to take effect. Failure to do so can result in old values being used or new configurations not being applied.
By being aware of these common pitfalls and following best practices, developers can avoid potential issues when working with environment variables in Ember.js.
What is the difference between "env" variables and configuration files in Ember.js?
In Ember.js, both environment variables and configuration files are used to customize and configure the behavior of the application, but they serve different purposes:
- Environment Variables: Environment variables are values that are set at the operating system level, outside the application code. They can be accessed within the Ember application code using the process.env.VARIABLE_NAME syntax. Environment variables are typically used for sensitive information or dynamic values that may change between different deployment environments (e.g., development, staging, production). Examples of environment variables can be database connection strings, API keys, and access tokens.
- Configuration Files: Configuration files are specific files within the Ember application codebase that define settings and behaviors. They provide a structured way to configure components, services, and various aspects of the application. Configuration files in Ember.js are typically written in JavaScript and are organized in different files based on their purpose, such as config/environment.js, config/app.js, or custom configuration files for specific addons or libraries. These files can be used to configure various options like the application name, module prefixes, addon configurations, data store settings, and more. Configuration files are typically used for defining static settings that are shared across all environments.
In summary, environment variables are used for dynamic and sensitive values that can change between environments, while configuration files are used for static configuration settings that are shared across all environments.