
Best Ember.js Router Guides to Buy in June 2026
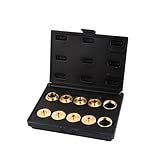
O'SKOOL 10 pcs Brass Router Template Bushing Guides Sets Fit Any Router Sub-base of the Porter Cable style
- VERSATILE 10-PIECE KIT COMPATIBLE WITH MOST ROUTERS.
- DURABLE STORAGE CASE FOR EASY ORGANIZATION AND TRANSPORT.
- INCLUDES ESSENTIAL BUSHINGS FOR PRECISE ROUTING TASKS.


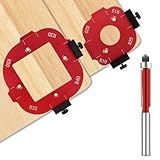
ETCYAOXIN Router Templates and Jigs for Woodworking,Guides and Edge Guide for Precision Routing,Router Tool,Corner Radius Templates for Routers R10/R15/R20/R25/R30/R35/R40/R50
- DURABLE ALUMINUM DESIGN: PRECISION-MACHINED FOR LONG-LASTING PERFORMANCE.
- VERSATILE USE: PERFECT FOR CRAFTING PICTURE FRAMES AND FURNITURE EDGES.
- EASY SETUP: ADJUST EDGE STOPS FOR QUICK, PRECISE CORNER ROUTING.

204358001 Edge Guide Assembly/Trim Router Edge Guide - by Ohoho - Compatible with Ryobi Router Edge Guide - Fits Model P601, PCL424B, PCL424, R2401, P206
- EASY INSTALLATION FOR QUICK SETUP WITH COMPATIBLE RYOBI ROUTERS.
- DURABLE CONSTRUCTION ENSURES LONG-LASTING PERFORMANCE AND RELIABILITY.
- REPLACE PART 204358001 FOR PERFECT FIT WITH SELECT RYOBI MODELS.

DEWALT Universal Router Edge Guide with Dust Collection, Fine Adjustment, Vacuum Adaptor (DW6913)
- PRECISION POSITIONING WITH FINE FENCE ADJUSTER FOR ACCURACY.
- VERSATILE COMPATIBILITY WITH ALL DEWALT ROUTERS.
- HIGH-QUALITY MATERIALS ENSURE DURABILITY AND RELIABILITY.
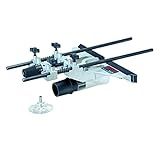
BOSCH RA1054 Deluxe Router Edge Guide with Dust Extraction Hood & Vacuum Hose Adapter
- CONVERT EASILY BETWEEN ROUTER AND CIRCLE GUIDE FOR VERSATILE CUTS!
- COMPATIBLE WITH MOST BOSCH ROUTERS FOR MAXIMUM FUNCTIONALITY.
- PRECISION ADJUSTMENTS ENSURE ACCURATE CUTS EVERY TIME!

DNP618 Edge Guide for Fixed Base Compact Router, Compatible With DEWALT DWP611 Router, PORTER-CABLE 450 & 451-Adjustable for Quick Attachment To Router Mounting Base, Fits Router DCW600B, DW6913. etc
-
QUICK ATTACH DESIGN FOR COMPACT ROUTERS ENSURES EFFICIENT SETUP.
-
ADJUSTABLE EDGE GUIDES FOR PRECISE ROUTING AND IMPROVED ACCURACY.
-
DURABLE CONSTRUCTION FOR LONG-LASTING PERFORMANCE IN ANY WORKSHOP.

11Pcs Brass Router Bushing Guide Set, Router Template Guide with Lock Nut Adapter, Compatible with Porter Cable Style Router Sub-Bases, for Dovetailing, Cut Out Work & Woodworking Router Accessories
- ACHIEVE WOODWORKING PRECISION WITH OUR GUIDED BUSHING SET.
- DURABLE BRASS CONSTRUCTION ENSURES LONGEVITY AND STABILITY.
- 11-PIECE SET MEETS DIVERSE WOODWORKING NEEDS WITH EASE.
In Ember.js, you can use multiple router objects to manage different sections or features of your application. Each router object represents a specific area or functionality of your application. Here's how you can use multiple router objects in Ember.js:
- Define multiple router objects: Instead of having a single router file, you can create multiple router objects in separate files. For example, if you have an e-commerce application, you might have a main router object for the overall application and additional router objects for specific sections like product listings, cart, and checkout.
- Configure each router object: Each router object should define its own routes, actions, and any necessary configuration. In the router file, use the Router.map function to define the routes specific to that router object. For example, a product listing router may have routes for viewing individual products, adding them to cart, etc.
- Use the engines feature: Ember.js provides an engines feature that allows you to create isolated, mountable applications. Each router object can be treated as a separate engine. By defining engines, you can keep your code modular and organize it based on functionality. These engines can be added to the main application's router.
- Set up routing hierarchy: With multiple routers, you need to define a routing hierarchy. This hierarchy determines how the different routers relate to each other. For example, you might set up the main application router as the parent router and register additional routers as child routers.
- Transition between router objects: To transition between different router objects, you can use the Ember.js transitionToRoute method. This method allows you to specify the route name along with the appropriate router object. For example, to transition from the main application route to the product listing route, you would use transitionToRoute('product-listing', productRouter).
By using multiple router objects in Ember.js, you can build complex applications with modular and manageable code. Each router object can focus on specific functionality, making it easier to develop and maintain your application.
What is the role of the Ember.js router service when using multiple router objects?
The Ember.js router service is responsible for coordinating and managing the actions and transitions between different router objects in an Ember.js application.
When using multiple router objects, the router service acts as a central authority that keeps track of the current state of each router object and handles the transitioning between them. It enables communication and coordination between the routers, allowing them to work together in harmony.
The router service also provides a set of methods and properties that can be used by the router objects to perform common tasks, such as transitioning to a different route or accessing information about the current route. This helps in keeping the routers consistent and avoids duplication of code and logic.
Overall, the router service plays a crucial role in maintaining the integrity and functionality of the multiple router objects in an Ember.js application.
What is the role of URL serialization and deserialization with multiple router objects in Ember.js?
In Ember.js, URL serialization and deserialization play a crucial role in managing multiple router objects.
Serialization refers to the process of converting the state of an application into a URL. It involves extracting relevant data from different router objects and generating a URL that represents the current application state. This serialized URL can then be shared or bookmarked.
Deserialization, on the other hand, involves the process of converting a URL back into the corresponding application state. The serialized URL is parsed, and the relevant data is extracted and used to update the state of the router objects. This ensures that the application is restored to the same state as represented by the URL.
When working with multiple router objects, each router object may have its own set of routes and associated parameters. URL serialization and deserialization provide a mechanism to synchronize the state of all these router objects. It allows for proper navigation within the application, ensuring that the appropriate router objects are activated and their respective states are updated based on the URL.
By using URL serialization and deserialization, developers can ensure that the application's state is properly represented by the URL, and that multiple router objects can work together to handle different parts of the application. This enables users to easily share and navigate to specific parts of the application, while maintaining a consistent and synchronized state.
What is the purpose of having multiple router objects in Ember.js?
One purpose of having multiple router objects in Ember.js is to organize and manage different sections or pages within an application.
Having multiple router objects allows developers to define different routes, route handlers, and nested routes for different parts of the application. This helps in managing complex applications with multiple nested components or sections.
For example, consider an e-commerce application. It may have separate router objects for the customer dashboard, admin dashboard, and product pages. Each router object can define its own routes and associated templates and controllers, making it easier to manage and navigate different sections of the application.
Having multiple router objects also helps in encapsulating logic and functionality specific to each section of the application, making code modular and reusable. It allows different teams or developers to work independently on different sections of the application.
In addition, multiple router objects provide a way to handle authentication and authorization at a granular level. Each router object can have its own authentication rules and middleware, ensuring that only authorized users can access certain sections of the application.
Overall, having multiple router objects in Ember.js helps in organizing, managing, and modularizing complex applications, enhancing code reusability and maintainability.
How to handle authentication and authorization with multiple router objects in Ember.js?
In Ember.js, handling authentication and authorization with multiple router objects can be accomplished by following these steps:
- Define a BaseRouter object that extends the Ember.Router class. This base router will handle the authentication and authorization logic for all other routers.
- Create separate router objects for each authenticated and authorized section of your application. These routers should extend the BaseRouter instead of the Ember.Router class.
- Implement the necessary beforeModel and model hooks in the BaseRouter to enforce authentication and authorization rules. The beforeModel hook can be used to redirect unauthenticated users to the login page, while the model hook can be used to check if the user has the required permissions to access a specific route. // app/router/base.js import EmberRouter from '@ember/routing/router'; export default class BaseRouter extends EmberRouter { beforeModel(transition) { // Redirect unauthenticated users to login page if (!this.isAuthenticated()) { this.transitionTo('login'); } } model() { // Check if user has required permissions to access the route // ... } isAuthenticated() { // Implement authentication logic, e.g., check if user is logged in // ... } }
- Define individual route objects for each route within the routers that extend the BaseRouter. These routes should contain the necessary route-specific authentication and authorization logic. // app/router/admin.js import BaseRouter from './base'; export default class AdminRouter extends BaseRouter { // Define routes for authenticated and authorized admin section }
- Import and mount the individual router objects in your app/router.js file. // app/router.js import EmberRouter from '@ember/routing/router'; import config from './config/environment'; import AdminRouter from './router/admin'; import UserRouter from './router/user'; const Router = EmberRouter.extend({ location: config.locationType, rootURL: config.rootURL }); Router.map(function() { // Define routes for unauthenticated section }); Router.map(function() { this.mount('admin', { as: 'admin' }); }); Router.map(function() { this.mount('user', { as: 'user' }); }); export default Router;
By structuring your application's router objects in this way, you can handle authentication and authorization separately for each authenticated and authorized section, while sharing common logic in the BaseRouter.
How to access different router objects within components in Ember.js?
In Ember.js, you can access different router objects within components by using the @router argument. The @router argument is provided automatically when the component is instantiated and you can use it to access the current router service.
Here's an example of how you can access the different router objects within a component:
import Component from '@glimmer/component'; import { inject as service } from '@ember/service';
export default class MyComponent extends Component { @service router;
// Method to access different router objects accessRouterObjects() { // Access the current route name const currentRouteName = this.router.currentRoute.name;
// Access the current URL
const currentURL = this.router.currentURL;

// Access the transition object
const transition = this.router.\_router.\_routerState.transition;

// Access the current route's model
const model = this.router.currentRoute.model;

// Access the parent route name
const parentRouteName = this.router.currentRoute.parent.name;
} }
In the example above, we have injected the router service into the component using the @service decorator. This allows us to access the router objects like currentRouteName, currentURL, transition, model, and parentRouteName within the accessRouterObjects method.
Note that accessing private properties like _router and _routerState should be used with caution and is not recommended in most scenarios. It's better to rely on the public API provided by Ember.js.