Best Nuxt.js and Laravel Integration Tools to Buy in June 2026
NUX B-6PRO 2.4GHz Wireless Microphone System for Saxophones, Utra-Low Latency,165 feet Range, Auto Pairing, Frequency Hopping, Perfect for Trumpets, Brass, Woodwind Instruments
- EFFORTLESS AUTOMATIC PAIRING FOR QUICK SETUP!
- EXTENDED 50M RANGE WITH ULTRA-LOW LATENCY (≤3.6MS)!
- PATENTED SHOCK-ABSORBING DESIGN FOR PURE AUDIO FOCUS!


NUX Mighty Plug Pro MP-3 Headphone Amp for Guitar/Bass, Various Effects, Amp Modeling, Silent Practice,512 Samples IR Resolution,5hrs Playing Time
-
PRACTICE ANYTIME, NOISE-FREE: PLAY GUITAR/BASS WITHOUT COMPLAINTS!
-
STREAMLINE YOUR SOUND: BLUETOOTH & USB FOR SEAMLESS LIVESTREAMING!
-
VERSATILE SOUND OPTIONS: 7 PRESETS AND 512 IR SAMPLES FOR ALL STYLES!
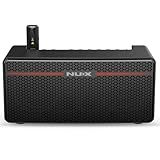
NUX Mighty Lite BT MKII Guitar Amp, 3W Electric Guitar/Bass Amplifier with Clean/Overdrive/Distortion Channel,7 Presets,512 Samples IR, Built in Drum Machine, Desktop Amplifier with Bluetooth
-
ULTIMATE PORTABILITY: LIGHTWEIGHT DESIGN FOR MUSIC ANYWHERE, ANYTIME.
-
STUDIO-GRADE SOUND: ADVANCED ALGORITHMS DELIVER AUTHENTIC ANALOG TONES.
-
VERSATILE CONTROL: EASILY TWEAK SETTINGS WITH MIGHTYAMP SOFTWARE AND PRESETS.
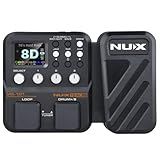
NUX MG-101 Multi Effects Pedal with 46 Effects, 25 Classic Amp Models, 512 Samples IR Resolution, 12 user-loadable IR slots, JAM–Phrase Looper, Drum Machine, Metronome Function,
- UNLOCK ENDLESS TONES WITH 25 AMP MODELS AND 512 HIGH-RES IR SAMPLES!
- CRAFT YOUR SOUND USING 12 USER-LOADABLE IR SLOTS FOR ULTIMATE CUSTOMIZATION.
- IMPROVE MUSICIANSHIP WITH A BUILT-IN LOOPER AND DRUM MACHINE FOR PRACTICE!
NUX Mighty Space Wireless 30W Portable Modeling Guitar Amplifier with Built-in IRs, 7 Presets, Dual 4'' Loud Coaxial Speakers, 7hrs Playing Time,Ultra-low System Latency
-
30W POWER, WIRELESS FREEDOM: PRO-GRADE SOUND WITHOUT MESSY CABLES!
-
ULTRA-PORTABLE DESIGN: PERFECT FOR PRACTICE, GIGS, OR HOME USE!
-
VERSATILE EFFECTS: SHAPE YOUR SOUND WITH 34 BUILT-IN OPTIONS EASILY!
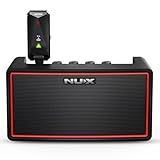
NUX Mighty Air Wireless Stereo Modelling Guitar/Bass Amplifier with Bluetooth, Mobile App, User Friendly Music Player, Up to 18 Hours Playing Time
- WIRELESS FLEXIBILITY: PRACTICE FREELY WITH GUITAR/BASS, NO CABLES NEEDED!
- NOISE-FREE SESSIONS: BUILT-IN NOISE GATE ENSURES PURE SOUND QUALITY.
- MIGHTYAMP CONTROL: CUSTOMIZE SOUNDS EASILY WITH OUR MOBILE APP.
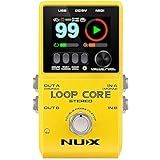
NUX Loop Core Stereo Looper Guitar Pedal, Effect Pedal for Electric Guitar, 6 Hours Record Time, Stereo Audio,MIDI Control, HD Color LCD Screen, Customize Boot-Up Picture
-
RECORD UP TO 6 HOURS-ENDLESS CREATIVITY FOR PRACTICE AND LIVE GIGS!
-
VIVID HD LCD DISPLAY-CLEAR VIEW AND RESPONSIVE EDITING FOR SEAMLESS USE.
-
99 MEMORY SLOTS & MIDI CONTROL-EASILY MANAGE LOOPS WITH EXTERNAL MIDI COMMANDS!
To use Nuxt.js with Laravel, you can set up Nuxt.js as a frontend framework for your Laravel application. First, you need to install Nuxt.js by running the command npm install create-nuxt-app -g. Then, create a new Nuxt.js project using the command npx create-nuxt-app . Once the project is created, you can integrate it with your Laravel application by setting up API routes in Laravel to communicate with the Nuxt.js frontend. You can also use Laravel Passport for authentication and set up a proxy in the Nuxt.js config to redirect API requests to your Laravel backend. Finally, build and deploy your application to see Nuxt.js working seamlessly with Laravel.
How to create reusable components in Nuxt.js for Laravel projects?
To create reusable components in Nuxt.js for Laravel projects, you can follow these steps:
- Create a new folder in your Nuxt.js project for your reusable components. You can name this folder something like "components" or "shared-components".
- Within this folder, create a new Vue component file for each reusable component that you want to create. You can use the Vue CLI or manually create these files.
- In each component file, define the template, script, and style for the component as you normally would in a Vue.js application.
- Once you have created all of your reusable components, you can import and use them in your Nuxt.js pages or layouts as needed.
- To make these components truly reusable across your Nuxt.js and Laravel projects, you can consider creating a separate npm package for your components and publishing it to npm. This way, you can install and use the components in any project by simply including the package as a dependency.
- Alternatively, you can also manually copy the component files from your Nuxt.js project to your Laravel project and import them as needed. Just make sure to keep the component files organized and updated in both projects.
By following these steps, you can create reusable components in Nuxt.js that can be easily integrated into your Laravel projects, providing a consistent and modular design across your applications.
What tools can be used for debugging and testing Nuxt.js applications with Laravel?
Some tools that can be used for debugging and testing Nuxt.js applications with Laravel are:
- Vue.js Devtools: A browser extension that allows you to inspect and debug Vue.js applications.
- Laravel Telescope: A debugging assistant and application profiler for Laravel applications.
- Jest: A JavaScript testing framework that can be used to write and run tests for Nuxt.js applications.
- Laravel Dusk: A browser automation and testing tool that can be used to test the front-end of Laravel applications.
- Cypress: Another browser automation and testing tool that can be used to test the front-end of Nuxt.js applications.
- PHPUnit: A testing framework for PHP that can be used to write and run tests for the backend of Laravel applications.
By using a combination of these tools, developers can effectively debug and test their Nuxt.js applications with Laravel.
How to handle file uploads in a Nuxt.js and Laravel project?
To handle file uploads in a Nuxt.js and Laravel project, you can follow these steps:
- Create a form in your Nuxt.js frontend that includes an input field of type 'file' for users to upload files.
- Use the "multipart/form-data" encoding type in your form to allow file uploads.
- Handle the form submission in your Nuxt.js frontend by capturing the file input's value and sending it as a FormData object in a POST request to your Laravel backend.
- Set up an API route in your Laravel backend to receive the file upload request. You can use Laravel's built-in file storage functionality to handle the uploaded files.
- In your Laravel controller method that handles the file upload, use the Request object to access the uploaded file and save it to a storage location on your server. You can use Laravel's Storage facade to manage the file storage.
- Return a response from your Laravel backend indicating the status of the file upload (success or error) to your Nuxt.js frontend.
- Handle the response in your Nuxt.js frontend and provide feedback to the user based on the file upload status.
By following these steps, you can successfully handle file uploads in a Nuxt.js and Laravel project.
What role does Laravel play in a Nuxt.js application?
Laravel is a PHP framework that is commonly used to build backend services in web applications. In a Nuxt.js application, Laravel can be used to handle backend services, APIs, database interactions, authentication, and other server-side functionalities.
Laravel can be integrated with Nuxt.js by creating a RESTful API using Laravel's built-in features such as Eloquent ORM for database interactions, middleware for authentication and authorization, and routing for handling API requests. Nuxt.js can then consume these APIs to retrieve data and interact with the backend.
Overall, Laravel plays a crucial role in providing the backend infrastructure and services needed for a Nuxt.js application to function effectively and deliver a seamless user experience.
How to handle authentication with JWT tokens in a Nuxt.js and Laravel application?
To handle authentication with JWT tokens in a Nuxt.js and Laravel application, you can follow these steps:
- Install and configure the Laravel JWT package: First, install the tymon/jwt-auth package in your Laravel application by running the following command:
composer require tymon/jwt-auth
Next, publish the package's configuration file by running:
php artisan vendor:publish --provider="Tymon\JWTAuth\Providers\LaravelServiceProvider"
Then, generate the JWT secret key by running:
php artisan jwt:secret
Finally, configure the JWT settings in the config/jwt.php file.
- Implement JWT authentication in your Laravel application: Next, implement JWT authentication in your Laravel application by following the package's documentation. This usually involves creating an authentication controller, implementing the necessary routes, and adding middleware to authenticate users with JWT tokens.
- Set up JWT authentication in your Nuxt.js application: To authenticate users using JWT tokens in your Nuxt.js application, you can use the @nuxtjs/auth module. First, install the module by running:
npm install @nuxtjs/auth
Next, configure the module in your nuxt.config.js file with the necessary settings, including the strategies for JWT authentication.
- Make API requests with JWT tokens: When making API requests from your Nuxt.js application to your Laravel backend, include the JWT token in the request header. You can store the token in a Vuex store or in the Nuxt.js auth module.
- Implement token expiration and refresh: To handle token expiration and refresh, you can configure the Laravel JWT package to automatically refresh tokens when they expire. You can also implement a mechanism in your Nuxt.js application to handle token expiration and refresh, such as intercepting API responses to check for token expiration.
By following these steps, you can successfully handle authentication with JWT tokens in a Nuxt.js and Laravel application.