
Best Debugging Tools to Buy in June 2026

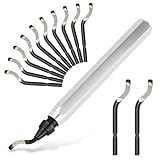
Deburring Tool with 12 High Speed Steel Blades, Deburring Tool 3D Printing, Deburring Tool for Metal, Resin, Copper, Plastic, PVC Pipes, 3D Printed Edges (1 Blue Handle)
- EFFORTLESS BLADE CHANGES FOR VERSATILE USAGE ACROSS VARIOUS MATERIALS.
- SHARP CUTTER HEAD ENSURES QUICK, SMOOTH BURR REMOVAL FOR PERFECT FINISHES.
- NON-SLIP METAL HANDLE AND DURABLE TIPS GUARANTEE LONG-LASTING PERFORMANCE.


AFA Tooling - Deburring Tool Micro-Polished & Anodized Handle with 11 High-Speed Steel M2 Blades, Deburring Tool 3D Printing, Reamer Tool for Metal, PVC, Copper Pipe, Plastic, Resin & 3D Printed Edges
-
COMES WITH 11 HEAVY-DUTY S-BLADES FOR EXTENDED USE.
-
VERSATILE FOR BRASS, STEEL, PVC, AND 3D-PRINTED PARTS.
-
DURABLE HSS STEEL BLADES LAST 80% LONGER THAN REGULAR STEEL.
Deburring Tool with 12 High Speed Steel Blades, Deburring Tool 3D Printing, Deburring Tool for Metal, Resin, Copper, Plastic, PVC Pipes, 3D Printed Edges (1 Silver Handle)
-
VERSATILE TOOL KIT: 12 EASY-TO-CHANGE BLADES FOR VARIOUS PROJECTS.
-
EFFORTLESS DEBURRING: SHARP CUTTER HEAD ENSURES SMOOTH, EVEN SURFACES.
-
DURABLE DESIGN: PREMIUM METAL HANDLE AND TIPS FOR LONG-LASTING USE.

Coeweule Premium Deburring Tool with 15 Pcs High Speed Steel Swivel Blades, Deburring Tool for Metal, Resin, PVC Pipes, Plastic, Aluminum, Copper, Wood, 3D Printing Burr Removal Reamer Tool Red
- 15 SPARE BLADES ENSURE SMOOTH, ACCURATE RESULTS FOR ALL WORKPIECES.
- 360° ROTATING BLADE ADAPTS EFFORTLESSLY TO VARIED SHAPES AND EDGES.
- DURABLE ALUMINUM HANDLE AND TEMPERED STEEL BLADE FOR LONG-LASTING USE.

Deburring Tool with 12 High Speed Steel Blades, Deburring Tool 3D Printing, Deburring Tool for Metal, Resin, Copper, Plastic, PVC Pipes, 3D Printed Edges (1 Black Handle)
-
VERSATILE KIT: 12 BLADES FOR VARIOUS MATERIALS AND LONG-LASTING USE.
-
EFFORTLESS OPERATION: QUICK BLADE CHANGES ENSURE EFFICIENT DEBURRING.
-
PREMIUM GRIP: NON-SLIP METAL HANDLE FOR COMFORT AND PRECISION.

VASTOOLS Deburring Tool for 3D Printer,18pcs,10pc Multiuse Blades Removing Burr,6Pcs Needle File,Micro Wire Cutter for 3D Print, Plastic Models
-
VERSATILE TOOL FOR DEBURRING METALS, PLASTICS, AND 3D PRINTS EASILY.
-
COMPLETE SET: 6 NEEDLE FILES FOR INTRICATE FINISHING AND SHAPING TASKS.
-
IDEAL FOR DIY PROJECTS, REPAIRS, AND ARTISTIC CREATIONS-LIMITLESS USES!
To display console.logs using webpack build, you can simply add the console.log statements in your JavaScript code. When you run the webpack build command, it will bundle all your code and include the console.log statements in the output bundle file. You can then open your browser console to view the console logs generated by your code during runtime. Make sure to check that your webpack configuration is set up properly to bundle your JavaScript code and include any necessary plugins or loaders for handling console.log statements.
What is the purpose of using console.warn and console.error?
The purpose of using console.warn and console.error in JavaScript is to log warning and error messages to the console for debugging purposes.
console.warn is used to log warning messages, which are typically used to indicate potential issues or problems that should be addressed but do not necessarily prevent the program from running successfully.
console.error is used to log error messages, which typically indicate critical issues that may cause the program to crash or malfunction. These messages help developers identify and fix bugs in their code.
By using these console methods, developers can easily identify and track down potential problems in their code and ensure that their applications are running smoothly.
What is the significance of using console.groupCollapsed?
Using console.groupCollapsed allows developers to organize and group related console log messages together in a collapsed state. This can make it easier to navigate and analyze large amounts of log data, especially when debugging complex applications.
By collapsing the group, developers can hide the detailed log messages until they are ready to view them, keeping the console output clean and organized. This can help in identifying patterns, debugging issues, and understanding the flow of the application more easily.
In addition, grouping related messages can also help in providing context and structure to the console logs, making it easier to trace the flow of execution and understand the relationships between different parts of the code. This can be especially useful in troubleshooting and debugging scenarios.
What is the syntax for logging messages to the console in JavaScript?
To log messages to the console in JavaScript, you can use the console.log() method with the message you want to log as the argument. Here is the syntax:
console.log('This is a message to log');
You can also log multiple messages by separating them with commas:
console.log('Message 1', 'Message 2', 'Message 3');
You can also use string concatenation to log variables or expressions:
let variable = 'Hello'; console.log(variable + ' World');
How to format console.logs in JavaScript?
There is no specific way to format console logs in JavaScript, as it depends on your personal preference and the context in which you are working. However, here are a few common approaches to formatting console logs in JavaScript:
- Basic formatting: You can simply concatenate strings and variables using the + operator to create a formatted console log message. For example:
console.log('Hello, ' + name + '! Welcome to our website.');
- Template literals: Template literals allow you to interpolate variables and expressions within a string using backticks (`). For example:
console.log(`Hello, ${name}! Welcome to our website.`);
- JSON.stringify(): If you want to log objects or arrays in a formatted way, you can use the JSON.stringify() method with the null and 2 parameters for indentation. For example:
const user = { name: 'Alice', age: 25 }; console.log(JSON.stringify(user, null, 2));
These are just a few examples of formatting console logs in JavaScript. You can explore other methods or libraries to format your console output as needed.
How to log exceptions with console.exception?
To log exceptions with console.error, you can use the following syntax:
try { // code that may throw an error throw new Error('This is an example error'); } catch (error) { console.error(error); }
This will catch any errors that occur within the try block and log them to the console using console.error. You can also log custom error messages by passing a string to console.error:
try { // code that may throw an error throw new Error('This is an example error'); } catch (error) { console.error('An error occurred: ' + error.message); }
This will log "An error occurred: This is an example error" to the console.