
Best Ember.js Reference Tools to Buy in June 2026
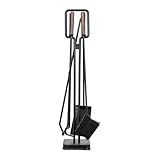
Modern Ember Levi 5 Piece Fireplace Tool Set in Black with Walnut Wood Handles | Includes Brush, Shovel, Fire Poker, Tongs, and Stand | Heavy-Duty Steel | Heat-Resistant Powder Coating
- UPGRADE YOUR HEARTH WITH A STYLISH 5-PIECE TOOL SET FOR ALL NEEDS.
- BUILT TO LAST: HEAVY-DUTY STEEL WITH HEAT & CORROSION RESISTANCE.
- INSTANTLY ENHANCE DÉCOR WITH CHIC WALNUT WOOD HANDLES AND DESIGN.


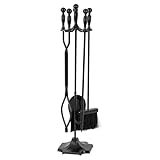
Modern Ember Cascade 5 Piece Fireplace Tool Set in Black | Includes Brush, Shovel, Fire Poker, Tongs, and Stand | Heavy Guage, Coated Steel | Heat-Resistant Plating | Sleek Rounded Handles
-
COMPLETE 5-PIECE SET FOR ALL YOUR FIREPLACE NEEDS-BRUSH, SHOVEL & MORE!
-
BUILT TO LAST WITH HEAVY-GAUGE STEEL; HEAT & CORROSION-RESISTANT.
-
STYLISH WOOD HANDLES ENHANCE BOTH TRADITIONAL AND MODERN DECOR.
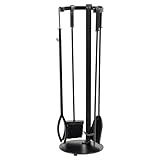
Modern Ember Knoll Fireplace Tool Set in Black - Includes Brush, Shovel, Fire Poker, Tongs, and Stand - Steel Construction
- SLEEK BLACK DESIGN ENHANCES ANY MODERN HOME DÉCOR EFFORTLESSLY.
- DURABLE STEEL CONSTRUCTION ENSURES LONG-LASTING PERFORMANCE AND STYLE.
- SIMPLE INSTALLATION ALLOWS YOU TO ENJOY YOUR FIREPLACE IN MINUTES.

Ember's Hollow
In Ember.js, referencing a clicked object can be done by using the action helper along with a function defined in the component or controller that handles the click event.
First, ensure that the object you want to reference in the click event is available in the component or controller's context. This could be achieved by setting it as a property or passing it as an argument when invoking the component.
Next, within the template or view of the component, attach the click event to the element or component that you want to interact with. Use the action helper to bind the click event to a function defined in your component or controller.
For example, in a template:
{{#each objects as |object|}} <button {{action "handleClick" object}}>{{object.name}} {{/each}}
In the above code snippet, each button is associated with an object from an array (assuming objects were defined as a property or passed to the component). When any of the buttons are clicked, the handleClick function will be invoked, passing the clicked object as an argument.
In the corresponding component or controller, define the handleClick function to receive and utilize the clicked object:
actions: { handleClick(object) { // Access the clicked object console.log(object);
// Perform any desired operations with the object
// ...
} }
Inside the handleClick function, you can access and work with the clicked object, allowing you to update its properties, send it to an API, or perform any other desired action.
Remember to import Ember and define the necessary components and actions based on your application structure.
How to use Ember.js components in different routes?
To use Ember.js components in different routes, follow these steps:
- Create a new component by running the Ember CLI command ember generate component . This will generate the component files in the appropriate directory.
- Inside the component's template file (app/components/.hbs), define the markup and logic for the component. This template will be reused across different routes.
- Within any route where you want to use the component, import the component by using the import statement. For example, if your component is named my-component, add the line import MyComponent from '/components/my-component'; in the route file.
- Next, define the component within the route's template file (app/templates/.hbs). Use angle brackets and the component's name, like , to include the component in the template.
- Any necessary data can be passed to the component by using component attributes. In the route's controller or route handler, define the properties that you want to pass to the component. For example, you can define propertyName: value in the route's controller or this.set('propertyName', value) in the route's handler.
- To use the passed data within the component, declare the property as an argument in the component's template file (app/components/.hbs).
- Use the passed argument as needed within the component's template. For example, if the property passed is named propertyName, you can access it using {{@propertyName}} in the component template.
- Finally, you can also define actions in the component and pass them back to the routes to handle specific events. Use the {{action}} helper in the component's template file, associating it with an action in the component's JavaScript or in a route or controller. For instance, Click me.
By following these steps, you can create Ember.js components and use them across different routes, reusing code and ensuring consistency in your application.
How to add event handlers in Ember.js?
In Ember.js, you can add event handlers by using the actions hash in the respective component, controller, or route. Here's how you can do it:
- Component: import Component from '@ember/component'; export default Component.extend({ actions: { handleClick() { // Handle the click event } } }); In the component's template, you can add the event handler by using the {{action}} helper: Click Me
- Controller: import Controller from '@ember/controller'; export default Controller.extend({ actions: { handleClick() { // Handle the click event } } }); In the controller's template, you can add the event handler just like in the component: Click Me
- Route: import Route from '@ember/routing/route'; export default Route.extend({ actions: { handleClick() { // Handle the click event } } }); In the respective template, you can add the event handler: Click Me
Note that in Ember.js, event handlers are defined in the actions hash, and you can use them in the template using the {{action}} helper.
How to handle click events on Ember.js components?
In Ember.js, you can handle click events on components in a few different ways:
- Using the {{action}} helper: You can use the {{action}} helper in your component's template to handle click events. This helper will trigger a method or an action on your component when the specified event occurs. For example, to handle a click event, you can do:
<button {{action "handleClick"}}>Click me
In your component's JavaScript file, define the handleClick method to perform the desired actions:
actions: { handleClick() { // Code to handle the click event } }
- Using the click event listener: You can also handle click events by adding an event listener directly to the component's element using the didInsertElement hook. For example:
import Component from '@ember/component';
export default Component.extend({ didInsertElement() { this._super(...arguments); this.element.addEventListener('click', this.handleClick); },
willDestroyElement() { this._super(...arguments); this.element.removeEventListener('click', this.handleClick); },
handleClick() { // Code to handle the click event } });
With this approach, the click event will be handled by calling the handleClick method. Make sure to also remove the event listener in the willDestroyElement hook to avoid memory leaks.
- Using closure actions: If you want to pass data from the component to the action, you can use closure actions. In your component's template, invoke the action with the desired parameters:
{{!-- component.hbs --}} <button {{action (action handleClick "parameter")}}>Click me
In your component's JavaScript file, define the handleClick closure action:
actions: { handleClick(parameter) { // Code to handle the click event } }
These are some ways to handle click events on Ember.js components. The choice of approach depends on your specific requirements and preferences.
How to handle form submissions in Ember.js?
To handle form submissions in Ember.js, you can follow these steps:
- Create a form component: Create a form component using ember g component form-name. This will generate a component file and its template.
- Define form fields: In the component's template, define your form fields using HTML input tags or Ember.js form components like {{input}} or {{textarea}}.
- Add actions and event handlers: In the form component's JavaScript file, define an action method to handle form submissions.
actions: { submitForm() { // Get form data const formData = { field1: this.field1, field2: this.field2, // ... };
// Perform necessary actions with the form data like saving it or making an API request
// ...

// Reset form fields to initial values
this.set('field1', '');
this.set('field2', '');
// ...

// Redirect user to another route or display a success message
// ...
} }
- Handle form submission: In the form component's template, add an event listener to the form's submit event and call the action method defined in the component.
Submit
- Use the form component: Include the form component in the template where you want to display the form.
{{form-name}}
By following these steps, you can handle form submissions in Ember.js. Feel free to customize the form fields, actions, and event handlers as per your application's requirements.
How to use Ember.js build tools like Ember CLI?
To use Ember.js build tools like Ember CLI, follow these steps:
- Install Node.js: Ensure that you have Node.js installed on your machine as Ember CLI is built on top of Node.js. You can download and install Node.js from the official website (https://nodejs.org/).
- Install Ember CLI: Open your terminal or command prompt and run the following command to install Ember CLI globally on your system:
npm install -g ember-cli
- Create a new Ember.js project: Once Ember CLI is installed, you can create a new project by running the following command in the terminal:
ember new my-project
Replace "my-project" with the desired name for your project.
- Change directory: Navigate to the project directory using the following command:
cd my-project
Replace "my-project" with the name you provided in the previous step.
- Serve the application: To serve the Ember.js application locally for development, run the following command in the terminal:
ember serve
This command starts the development server and serves your application. By default, it will be available at http://localhost:4200.
- Build the application for production: When you are ready to deploy your Ember.js application in production, you need to build it. Run the following command in the terminal:
ember build --environment=production
This command will generate a production-ready build in the dist/ directory.
These are the basic steps to use Ember.js build tools like Ember CLI. You can further explore the Ember CLI documentation (https://cli.emberjs.com/) to learn about more advanced features and configurations.