
Best Chart.js Tooltip Customization Tools to Buy in June 2026
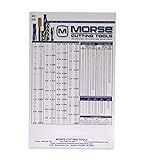
MORSE CUTTING TOOLS Heavy Duty Large Plastic Wall Chart - Decimal Equivalents, Recommended Drill Sizes for Taps, and Useful Formulas
- DURABLE .023 PLASTIC, PERFECT FOR LONG-LASTING USE.
- INCLUDES TAP DRILL SIZES FOR INCH, METRIC, AND PIPE THREADS.
- EASY WALL MOUNTING WITH THREE PUNCHED HOLES FOR CONVENIENCE.


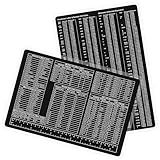
NELOMO 11.8” X 7.9” Toolbox Reference Card Toolbox Accessories Conversion Chart Card SAE Metric Ruler Standard Metric Conversion Charts Tap Drill Sizes Wrench Conversion Chart
-
ALL-IN-ONE REFERENCE: INSTANT SAE/METRIC CONVERSIONS & DRILL SIZES IN ONE CARD.
-
DURABLE & PORTABLE: STURDY, LAMINATED DESIGN FOR EASY OUTDOOR & INDOOR USE.
-
TIME-SAVING TOOL: IDEAL FOR DIYERS, ENGINEERS, AND CARPENTERS-EFFORTLESSLY CALCULATE!
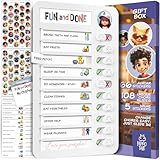
HIPPOTALE Chores Chart for Kids - Daily Routine Chart for Kids with Checklist & Stickers, Magnetic Kids Chore Chart - Chore Board Visual Schedule for Kids with Autism & Best ADHD Tools for Kids
- 120 CUSTOMIZABLE CARDS FOR PERSONALIZED CHORE MANAGEMENT
- VISUAL TASK BOARD: PERFECT FOR KIDS & NEURODIVERGENT NEEDS
- MAGNETIC & WALL-MOUNTABLE DESIGN FOR EASY ACCESSIBILITY
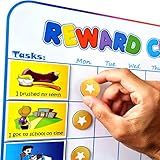
Large Magnetic Reward Chart for Kids - 127 Pre-Written Stickers (Including Potty Training) + 30 Customizable Chores - Behavior, Responsibility & Incentive Routine Star Chart for Fridge (1 Kid Version)
- FUN & ENGAGING WAY TO MOTIVATE KIDS WITH MAGNETIC REWARD SYSTEM!
- CUSTOMIZE TASKS EASILY WITH 30 DRY-ERASABLE TAGS AND 127 STICKERS!
- STRONG MAGNETS ENSURE STARS STAY IN PLACE FOR HASSLE-FREE USE!
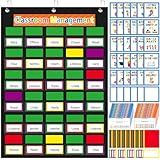
Pajean 253 Pcs Student Behavior Pocket Chart for Classroom Behavior Management Resources Track Reward Bulletin Board Customizable Class Jobs for Home Preschool Daycare Back to School Teacher Supplies
-
COMPLETE CLASSROOM KIT: EVERYTHING YOU NEED FOR EFFECTIVE BEHAVIOR MANAGEMENT.
-
VIBRANT & ENGAGING: BRIGHT COLORS AND CARTOON CARDS MAKE LEARNING FUN!
-
DURABLE & VERSATILE: WATERPROOF MATERIALS IDEAL FOR ANY CLASSROOM OR OFFICE.
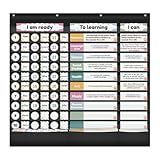
BOHEMIABY Objectives Board for Classroom, Learning Targets Display Pocket Chart, Dry Erase Reusable Attendance Chart, Customizable Objectives, Objectives Pocket Chart for Teacher Student(Black)
-
BOOST STUDENT FOCUS WITH ERASABLE GOAL SHEETS FOR EASY TRACKING.
-
CUSTOMIZABLE ATTENDANCE AND OBJECTIVES SHEET ENHANCES TEACHING FLOW.
-
DURABLE 91-PIECE SET ENSURES ENGAGING AND INTERACTIVE LESSONS DAILY.
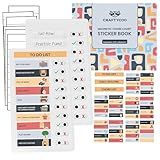
CRAFTYCOO Magnetic Checklist Chore Board with Chore Sticker Book, Chores Chart for Kids, Set of 2 Magnetic Customizable Chore Charts with Insert Paper and 212 Stickers, Chore Chart for Multiple Kids
- FUN & INTERACTIVE: MAKES CHORES EXCITING WITH SLIDING BUTTONS & STICKERS!
- VERSATILE USE: PERFECT FOR KIDS, ADULTS, OR ANY ROUTINE ORGANIZING NEEDS.
- EASY SETUP: MAGNETIC OR WALL-MOUNTED FOR EFFORTLESS PLACEMENT ANYWHERE!
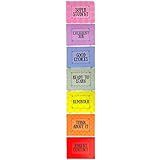
Behavior Chart for Kids, Full Sized Wall Hanging Behavior Clip Chart, Classroom and Household Behavior Management Tool, Completely Customizable, Teaching Supplies Suitable for School, Home or Daycare
- DURABLE, PROFESSIONAL-GRADE DESIGN ENSURES VIBRANT COLORS & LONGEVITY.
- TIME-SAVING SETUP WITH PRE-LAMINATED, CUSTOMIZABLE CARDS FOR EASE.
- USER-FRIENDLY FORMAT PROMOTES MINDFUL BEHAVIOR TRACKING IN CLASSROOMS.
To reformat the tooltip in Chart.js, you can customize its appearance by modifying the tooltip configuration options. Here are the steps to achieve this:
- First, make sure you have properly included the Chart.js library in your webpage.
- Create a canvas element in your HTML where you want to render the chart. Give it an id so that you can later access it in JavaScript code.
- In your JavaScript code, retrieve the canvas element using getElementById and create a new Chart instance with the desired chart type (e.g., line chart, bar chart) using the retrieved canvas element. var chartCanvas = document.getElementById('myChart'); new Chart(chartCanvas, { // chart configuration options here });
- Inside the chart configuration options, define a tooltips object to customize the tooltip. You can set various options to change its appearance, behavior, and content. new Chart(chartCanvas, { // other chart options options: { tooltips: { // tooltip customization options here } } }); For example, to change the background color of the tooltip, you can set the backgroundColor property: tooltips: { backgroundColor: 'rgba(255, 255, 255, 0.8)' // customize the background color } To change the font family, size, and color of the tooltip text, you can use the bodyFontFamily, bodyFontSize, and bodyFontColor properties: tooltips: { bodyFontFamily: 'Arial', // set the font family bodyFontSize: 14, // set the font size bodyFontColor: '#000000' // set the font color } These are just a few examples. Chart.js provides many more options to customize the tooltip, including title font properties, padding, border color, etc.
- Save the changes and reload your webpage to see the updated tooltip style.
By modifying various properties inside the tooltips configuration object, you can fully customize the appearance of the tooltip in Chart.js according to your requirements.
How to change tooltip visibility based on data in chart.js?
To change the tooltip visibility based on data in Chart.js, you can use the custom property of the options.tooltips configuration. This allows you to define a custom function that determines the visibility of each tooltip based on the data.
Here is an example of how you can achieve this:
var data = { labels: ["Red", "Blue", "Yellow", "Green", "Purple", "Orange"], datasets: [{ label: 'Data', data: [12, 19, 3, 5, 2, 3], borderColor: 'rgba(75, 192, 192, 1)', backgroundColor: 'rgba(75, 192, 192, 0.2)', }] };
var options = { tooltips: { custom: function(tooltipModel) { // Hide tooltip if value is less than 10 tooltipModel.opacity = data.datasets[tooltipModel.dataIndex].data[tooltipModel.dataIndex] < 10 ? 0 : 1; } } };
var ctx = document.getElementById('myChart').getContext('2d'); var myChart = new Chart(ctx, { type: 'bar', data: data, options: options });
In the above example, the custom function is used to modify the opacity property of the tooltipModel. Here, the tooltip will only be visible if the value of the corresponding data point is greater than or equal to 10. You can update this condition based on your specific requirement.
Note: Make sure to set the opacity property to 0 to hide the tooltip and 1 to show it.
In the custom function, you have access to the tooltipModel as an argument. This model contains various properties that you can use to customize the tooltip behavior such as opacity, title, body, x, y, etc.
By defining a custom function for tooltips, you have full control over when and how the tooltips are displayed based on the data in the chart.
What is the role of the tooltip title in chart.js?
The tooltip title in Chart.js is an optional element that provides additional information about the data point that is being hovered over. It is displayed at the top of the tooltip, usually as a bolded text, and can be used to give a brief description or label for the data being shown.
The tooltip itself is a small pop-up box that appears when the user hovers over a data point on the chart. It provides details such as the data value, labels, or any other relevant information associated with that particular data point.
The role of the tooltip title is to provide a clear and concise heading for the information being displayed in the tooltip. It helps users quickly identify the context or category of the data point and enhances the understanding of the data being visualized.
How to add images to the tooltip in chart.js?
In Chart.js, tooltips are accessed through the options.tooltips object. To add images to tooltips, you can use HTML content as the tooltip's callbacks.label property.
Here is an example of adding an image to the tooltip using Chart.js:
var chart = new Chart(ctx, { type: 'bar', data: { labels: ["January", "February", "March", "April", "May", "June", "July"], datasets: [{ label: 'Some Data', data: [12, 19, 3, 5, 2, 3, 12], backgroundColor: 'rgba(75, 192, 192, 0.2)', borderColor: 'rgba(75, 192, 192, 1)', borderWidth: 1 }] }, options: { tooltips: { callbacks: { label: function(tooltipItem, data) { var datasetLabel = data.datasets[tooltipItem.datasetIndex].label || ''; return datasetLabel + ': ' + tooltipItem.yLabel + ''; } } } } });
In this example, the label callback function is used to format the tooltip label. The label includes the dataset label, the y-value, and an image tag with the image URL.
Replace "your-image-url.jpg" with the actual URL of your image file.
Make sure that the HTML content you add to the tooltip is safe and properly escaped to prevent any security issues.
How to display tooltip for specific data points in chart.js?
To display a tooltip for specific data points in chart.js, you can use the following steps:
- First, create a chart using chart.js. For example, let's say you want to create a bar chart: var ctx = document.getElementById('myChart').getContext('2d'); var myChart = new Chart(ctx, { type: 'bar', data: { // Your chart data }, options: { // Your chart options } });
- Next, enable tooltips for the chart by setting the tooltips property in the chart options: options: { tooltips: { enabled: true } // Your other chart options }
- If you want to display tooltips only for specific data points, you can use the filter callback function in the tooltips property. This function will be called for each tooltip, allowing you to control whether to display it or not based on your conditions. For example, let's say you want to display tooltips only for data points with a value greater than 50: options: { tooltips: { enabled: true, filter: function(tooltipItem, data) { return data.datasets[tooltipItem.datasetIndex].data[tooltipItem.index] > 50; } } // Your other chart options }
- Finally, you can customize the appearance of the tooltips by using the callbacks property in the tooltips options. This allows you to define callback functions for different tooltip properties such as title, label, beforeLabel, afterLabel, etc. Here's an example of customizing the tooltip title and label: options: { tooltips: { enabled: true, filter: function(tooltipItem, data) { return data.datasets[tooltipItem.datasetIndex].data[tooltipItem.index] > 50; }, callbacks: { title: function(tooltipItems, data) { return 'Value: ' + tooltipItems[0].xLabel; }, label: function(tooltipItem, data) { return 'Label: ' + tooltipItem.yLabel; } } } }
By following these steps, you can display tooltips for specific data points in your chart.js chart.
How to disable the tooltip for specific datasets in chart.js?
To disable the tooltip for specific datasets in Chart.js, you can use the tooltips property and set the enabled option to false for the specific dataset(s) where you want to disable the tooltip. Here is an example:
// Create a chart var myChart = new Chart(ctx, { type: 'bar', data: { labels: ['Label 1', 'Label 2', 'Label 3'], datasets: [ { label: 'Dataset 1', data: [1, 2, 3], backgroundColor: 'rgba(255, 0, 0, 0.5)' }, { label: 'Dataset 2', data: [4, 5, 6], backgroundColor: 'rgba(0, 255, 0, 0.5)', tooltips: { enabled: false // Disable tooltip for this dataset } }, { label: 'Dataset 3', data: [7, 8, 9], backgroundColor: 'rgba(0, 0, 255, 0.5)' } ] }, options: { tooltips: { enabled: true // Set default tooltip behavior } } });
In the example, the tooltip is disabled for 'Dataset 2' by setting tooltips.enabled to false for that dataset only. By default, tooltips are enabled for all datasets, so you need to override it for specific datasets where you want to disable the tooltip.
What is the relationship between tooltips and tooltips callbacks in chart.js?
Tooltips and tooltips callbacks in Chart.js are related as follows:
Tooltips are small pop-up boxes that appear when a user hovers over a chart element (such as a data point, bar, or line) in Chart.js. These tooltips provide additional information about the data being displayed.
On the other hand, tooltips callbacks are functions that allow you to customize the content and appearance of the tooltips in Chart.js. By defining tooltips callbacks, you can have full control over the data displayed in tooltips and customize their appearance as per your requirements.
In summary, tooltips callbacks are used to customize the content and appearance of tooltips in Chart.js. They provide a way to dynamically generate or format the content of the tooltips based on the data being displayed.