
Best Dynamic Routing Tools for Svelte Apps to Buy in June 2026

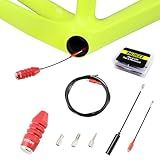
COONIUM Bike Internal Cable Routing Tool Kit Compatible with 4-5.5mm Cable Housing, Hydraulic Hose and DI2 E-Tube
- SIMPLIFIES ROUTING FOR CABLE HOUSING AND HYDRAULIC HOSES.
- COMPATIBLE WITH ALL NON-STEEL BIKE FRAMES FOR VERSATILITY.
- INCLUDES STORAGE CASE AND DETAILED INSTRUCTIONS FOR EASY USE.


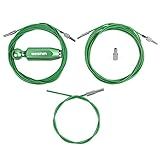
BESNIN Bicycle Internal Cable Routing Tool Cycling Bike Internal Cable Routing Tool for Bicycle Frame Shift
-
STRONG MAGNETS FOR SEAMLESS CABLE ROUTING THROUGH BIKE FRAMES.
-
QUICK-RELEASE ADAPTER FOR FAST INSTALLATION OF VARIOUS HOSE TYPES.
-
VERSATILE ADAPTERS CATER TO DIFFERENT CABLE AND HYDRAULIC HOSE NEEDS.

Dynamic Decision Support for Regional LTL Carriers: Planning Tools for Driver Management and Freight Routing
- AFFORDABLE PRICES ON QUALITY USED BOOKS FOR BUDGET-SAVVY READERS.
- ECO-FRIENDLY OPTION: PROMOTE SUSTAINABILITY BY BUYING USED BOOKS.
- VERIFIED CONDITION GUARANTEES YOUR SATISFACTION WITH EACH PURCHASE.

Bike Internal Cable Routing Tool Kit - Effortless Internal Cable Routing - Work with 4-5.5mm Cable Housing, Hydraulic Hose and DI2 E-Tube (Not for SD300 Wire)
-
EASY INTERNAL CABLE ROUTING FOR ALL NON-STEEL BIKE FRAMES.
-
ANTI-SCRATCH PROTECTION TO SAFEGUARD YOUR BIKE FRAME DURING USE.
-
CLEAR INSTRUCTIONS AND VIDEO GUIDE FOR HASSLE-FREE INSTALLATION.

BESNIN Internal Cable Routing kit Bicycle Internal Cable Routing Tool Cycling Bike Internal Cable Routing Tool for Bicycle Frame Put Out Inner Wire
-
POWERFUL MAGNET EFFORTLESSLY GUIDES CABLES THROUGH YOUR BICYCLE FRAME.
-
EASY CONNECTOR SYSTEM FOR QUICK AND USER-FRIENDLY INSTALLATIONS.
-
COMPREHENSIVE MANUAL AND VIDEOS FOR CLEAR INSTALLATION GUIDANCE.
MUQZI Bicycle Internal Cable Routing Tool, Bike Internal Cable Guide Tool for Bicycle Brake Shifter Cable Housing, Hydraulic Hose, Red
-
DURABLE DESIGN: HIGH-QUALITY METAL AND PLASTIC ENSURE LONG-LASTING USE.
-
VERSATILE ADAPTERS: QUICK TRACTION AND METAL ADAPTERS FOR SEAMLESS ROUTING.
-
STRONG MAGNET: GUIDES CABLES SMOOTHLY THROUGH FRAMES FOR HASSLE-FREE SETUP.
Bike Cable Routing Tool BESNIN Internal Cable Routing Kit Bike Frame Cable Guide for DI2 Tube/inner Cable/Brake Tube Cable Routing Kit
- EASY NAVIGATION: MAIN MAGNET STREAMLINES CABLE ROUTING PROCESS.
- COMPREHENSIVE MANUAL: INCLUDES MULTILINGUAL INSTRUCTIONS FOR ALL USERS.
- VERSATILE TOOLS: COMPLETE KIT FOR EFFICIENT INSTALLATION AND GUIDANCE.
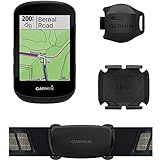
Garmin Edge 530 Sensor Bundle, Performance GPS Cycling/Bike Computer with Mapping, Dynamic Performance Monitoring and Popularity Routing, Includes Speed and Cadence Sensor and HR Monitor
- ADVANCED PERFORMANCE INSIGHTS WITH VO2 MAX AND RECOVERY TRACKING.
- ENHANCED SAFETY FEATURES: BIKE ALARM, GROUP MESSAGING, AND TRACKING.
- CUSTOMIZABLE WITH FREE APPS FROM CONNECT IQ STORE FOR TAILORED USE.
To implement dynamic routing in a Svelte app, you can follow these steps:
- Install a routing library: Start by installing a routing library like svelte-routing or svelte-spa-router. These libraries provide components and utilities to handle routing in your Svelte app. You can use a package manager like npm or yarn to install them.
- Configure routes: Define the routes you want to support in your app. This can be done by creating a route configuration file or by defining routes directly in your main Svelte component. Specify the component or page that will be rendered for each route.
- Set up the router: Initialize the routing library and configure it to handle routing in your app. This typically involves creating a router component that wraps your entire app and includes the necessary routing logic. You may need to provide the route configuration to the router component.
- Render components based on routes: In your Svelte components, use the routing library's components or APIs to render the appropriate component based on the current route. You can conditionally render components or use route parameters to load dynamic data.
- Handle navigation: Implement navigation functionality by using links or buttons with appropriate route information. You can use the routing library's components, such as Link or Route, to handle navigation and update the URL accordingly.
- Add route guards (optional): If needed, you can implement route guards to control access to certain routes. Route guards allow you to perform checks before navigating to a specific route, such as user authentication or authorization.
- Run and test: Run your Svelte app and test the dynamic routing functionality. Navigate between different routes, check if the components are rendered correctly, and ensure that navigation works as expected.
By following these steps, you can successfully implement dynamic routing in your Svelte app, allowing you to create a multi-page-like experience for your users.
What is a URL hash in Svelte routing?
In Svelte routing, a URL hash refers to the portion of a URL that is represented after the "#" symbol. It is commonly used to implement client-side routing in single-page applications (SPAs).
Svelte routing libraries, such as Routify or Svelte-routing, utilize the URL hash to identify and manage the different routes in an application. When a user navigates to a specific route, the library updates the URL hash accordingly to reflect the current route.
For example, if the URL of an application is "https://example.com/#/products", the "products" portion after the "#" is the URL hash. Svelte routing libraries can parse this hash to determine which route to display and update the application accordingly.
The usage of URL hash in routing provides several advantages, such as maintaining history, bookmarkability, and the ability to share URLs. Additionally, by using the URL hash, SPAs can handle routing on the client-side without requiring server-side rendering for every route change.
What is a route handler in Svelte?
In Svelte, a route handler is a component or function that handles a specific route in an application. It is responsible for rendering the appropriate content based on the current route.
Route handlers in Svelte typically utilize the Svelte Router package to map routes to components or functions. The router allows you to define routes and associate them with specific components, so that when a user navigates to a particular route, the associated component (route handler) is rendered.
For example, you can define a route handler for a route /home as follows:
import { Router, Link, Route } from "svelte-routing"; import Home from "./Home.svelte";
// ...
In the above code, the Router component is used to define the routes, and the Link component is used to create a link to the /home route. The Route component maps the /home route to the Home component, which acts as the route handler for that specific route.
When a user navigates to /home, the Home component will be rendered by the router, and any content defined within the Home component will be displayed on the page.
How to implement redirects in Svelte routing?
In Svelte routing, you can implement redirects by making use of the <svelte:component> special element and conditional rendering. Here's an example of how you can do it:
- Start by setting up your routing using a library like svelte-spa-router or svelte-routing. For example, let's use svelte-spa-router:
// Import necessary packages import { Router, Link } from "svelte-spa-router";
// Import your main component and other route components import Home from "./components/Home.svelte"; import About from "./components/About.svelte"; import NotFound from "./components/NotFound.svelte";
// Define your routes const routes = [ { path: "/", component: Home, }, { path: "/about", component: About, }, { path: "(.*)", component: NotFound, }, ];
// Render the router component new Router({ routes, });
- Inside your App.svelte or main component, you can add a redirect logic using :component> and conditional rendering. For example:
<svelte:component this="{Router}" />
In the code above, we conditionally render the router component (<svelte:component>) based on your redirect logic. If the shouldRedirect condition is met, the user will be redirected to the redirectTo path.
Remember to adjust the logic inside the shouldRedirect if statement according to your application's specific requirements.
Note: The example uses svelte-spa-router, but the concepts can be applied to other Svelte routing libraries as well.