
Best Chart.js Resources to Buy in June 2026

Learning Resources Good Job Reward Chart - 91 Piece Set, Custom Magnetic Chore and Responsibility Chart for Kids, Chore Magnets for Toddlers, Kids Job Chart
- FOSTER RESPONSIBILITY WITH A CUSTOMIZABLE MAGNETIC TASK CHART.
- REWARD ACHIEVEMENTS WITH A SPECIAL YOU'VE EARNED IT BOX.
- PERFECT GIFT FOR ALL OCCASIONS THAT PROMOTES LEARNING AND FUN!


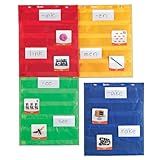
Learning Resources Magnetic Pocket Chart Squares - Set of 4, Classroom Pocket Charts, Classroom/Teacher Organizer, Classroom Supplies, Homeschool Supplies, Teaching Materials,Back to School Supplies
- BOOST ENGAGEMENT: PERFECT FOR INTERACTIVE GROUP ACTIVITIES AND LESSONS!
- VISUAL LEARNING: ENHANCE VOCABULARY AND MATH SKILLS WITH CLEAR POCKETS!
- DURABLE DESIGN: EASY STORAGE AND TRUSTED BY EDUCATORS FOR 40 YEARS!
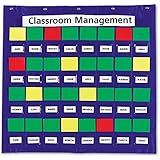
Learning Resources Junior Organization Station, Classroom Pocket Charts, Back To School Supplies, Homeschool
- TRACK HAND-WASHING & BEHAVIOR WITH CREATIVE CLASSROOM USES!
- STAY ORGANIZED WITH THIS ESSENTIAL CLASSROOM MANAGEMENT TOOL!
- EXCEPTIONAL VALUE: 32 NAME CARDS & DOUBLE-SIDED TITLES INCLUDED!
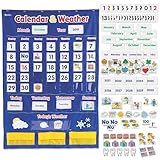
Learning Resources Calendar & Weather Pocket Chart - Classroom Calendar, Calendar and Weather Chart for Classroom, Teacher and Back to School Supplies
- ENGAGE KIDS WITH A VIBRANT CALENDAR AND WEATHER POCKET CHART!
- INCLUDES 136 DOUBLE-SIDED CARDS FOR INTERACTIVE LEARNING FUN!
- DURABLE VINYL DESIGN ENSURES YEARS OF EDUCATIONAL USE!
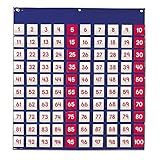
Learning Resources Hundred Pocket Chart, 120 Cards, Grades K+, Classroom Counting Organizer,Back to School Supplies,Teacher Supplies
-
DURABLE & WASHABLE: 100 CLEAR POCKETS FOR ENDLESS LEARNING FUN!
-
ENGAGING NUMBER LEARNING: BRILLIANT FOR SKIP COUNTING & MATH OPS!
-
INCLUDES 120 COLOR-CODED CARDS & GUIDE FOR EFFECTIVE TEACHING!
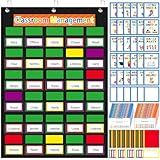
Pajean 253 Pcs Student Behavior Pocket Chart for Classroom Behavior Management Resources Track Reward Bulletin Board Customizable Class Jobs for Home Preschool Daycare Back to School Teacher Supplies
-
VIBRANT DESIGN: BRIGHT COLORS AND FUN CARDS ENHANCE STUDENT ENGAGEMENT!
-
VERSATILE SIZES: PERFECT FOR CLASSROOM, OFFICE, AND HOME ORGANIZATION.
-
DURABLE MATERIAL: WATERPROOF, LAMINATED CARDS ENSURE LONG-LASTING USE!
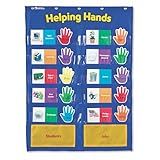
Learning Resources Helping Hands Pocket Chart, 30 Card, Classroom Organization, Teacher Accessories,Teacher Supplies for Classroom,Back to School Supplies
- BOOST TEAMWORK & SELF-ESTEEM WITH CUSTOMIZABLE CLASS JOB CARDS!
- INTERACTIVE WRITE & WIPE HAND CARDS FOR STUDENT OWNERSHIP AND FUN.
- TRUSTED QUALITY SINCE 1984; MAKE LEARNING ENGAGING WITH OUR TOOLS!
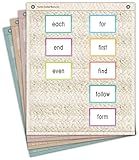
Teacher Created Resources Woven Magnetic Mini Pocket Charts (14" x 17") (TCR20108)
- COLORFUL, DURABLE DESIGNS ENHANCE CLASSROOM ENGAGEMENT EFFORTLESSLY.
- VERSATILE USE FOR WHOLE-CLASS OR INDIVIDUAL INSTRUCTION WITH EASE.
- EASY TO CLEAN; PROMOTES HYGIENE AND PREVENTS GERM SPREAD EFFECTIVELY.
To use chart.js in Node.js, you can install chart.js library in your Node.js project using npm. First, you need to install the chart.js library by running the command "npm install chart.js" in your Node.js project directory. Once the library is installed, you can create a new chart by using the Chart object provided by the library. You can include the chart.js library in your Node.js file by requiring it using the "require" keyword. Then, you can create a new chart object by passing the canvas element on which you want to render the chart, along with the configuration options for the chart. You can customize the appearance and behavior of the chart by modifying the configuration options. Finally, you can render the chart by calling the "render" method on the chart object. By following these steps, you can easily use chart.js in your Node.js project to create interactive and visually appealing charts for your web applications.
How to handle events on a chart in node.js with chart.js?
To handle events on a chart in Node.js with Chart.js, you can use the chart.js library to create interactive charts and then use the built-in event handling methods provided by Chart.js.
Here is a simple example of how you can handle events on a chart in Node.js with Chart.js:
- Create a new Chart.js chart using the Chart.js library in your Node.js application. You can include the Chart.js library in your application by installing it via npm:
npm install chart.js
- Once you have included the Chart.js library in your Node.js application, you can create a new chart by importing Chart.js and creating a new chart instance:
const Chart = require('chart.js');
const ctx = document.getElementById('myChart').getContext('2d'); const myChart = new Chart(ctx, { type: 'bar', data: { labels: ['Red', 'Blue', 'Yellow', 'Green', 'Purple', 'Orange'], datasets: [{ label: '# of Votes', data: [12, 19, 3, 5, 2, 3], backgroundColor: [ 'red', 'blue', 'yellow', 'green', 'purple', 'orange' ] }] } });
- Now you can handle events on the chart by using the built-in event handling methods provided by Chart.js. For example, you can add a click event listener to the chart and log the data of the clicked item:
myChart.canvas.addEventListener('click', function(event) { const activeElements = myChart.getElementsAtEvent(event); if (activeElements.length > 0) { const clickedElement = activeElements[0]; const datasetIndex = clickedElement._datasetIndex; const index = clickedElement._index; const dataValue = myChart.data.datasets[datasetIndex].data[index]; console.log(`Clicked on ${myChart.data.labels[index]} with value ${dataValue}`); } });
- Save the changes and run your Node.js application. Now, when you click on a chart element, the data of the clicked item will be logged to the console.
This is just a simple example of handling events on a chart in Node.js with Chart.js. You can explore the Chart.js documentation for more advanced event handling options and customization options.
How to update a chart dynamically in node.js using chart.js?
To update a chart dynamically in Node.js using chart.js, you can use the following steps:
- Install chart.js module by running the following npm command:
npm install chart.js
- Create a new chart instance in your Node.js application using the chart.js module. You can create a new chart by importing the module and specifying the chart options and data. For example:
const Chart = require('chart.js');
// Create a new chart instance const ctx = document.getElementById('myChart').getContext('2d'); const myChart = new Chart(ctx, { type: 'line', data: { labels: ['January', 'February', 'March', 'April', 'May'], datasets: [{ label: 'My Dataset', data: [10, 20, 30, 40, 50] }] } });
- To update the chart dynamically, you need to modify the chart data or options and then call the update method on the chart instance. For example:
// Update chart data myChart.data.datasets[0].data = [20, 30, 40, 50, 60];
// Update chart options myChart.options.title.text = 'Updated Chart Title';
// Update the chart myChart.update();
- You can trigger the chart update based on user actions, data changes, or on a timer interval in your Node.js application.
By following these steps, you can update a chart dynamically in Node.js using chart.js.
What is a chart click event in chart.js and how is it handled in node.js?
A chart click event in Chart.js is triggered when a user clicks on a data point or element within a chart. This event allows you to capture the click event and perform actions based on the click, such as displaying additional information or navigating to another page.
In a Node.js environment, you can handle the chart click event by adding an event listener to the Chart.js object. Here is an example of how you can handle a click event in a Node.js application using Chart.js:
const Chart = require('chart.js');
// Create a new Chart object const myChart = new Chart(ctx, { type: 'bar', data: { labels: ['Red', 'Blue', 'Yellow', 'Green', 'Purple', 'Orange'], datasets: [{ label: '# of Votes', data: [12, 19, 3, 5, 2, 3], backgroundColor: [ 'red', 'blue', 'yellow', 'green', 'purple', 'orange' ] }] } });
// Add event listener for click event myChart.canvas.addEventListener('click', function(evt) { const activeElement = myChart.getElementAtEvent(evt)[0]; if (activeElement) { const label = myChart.data.labels[activeElement._index]; const value = myChart.data.datasets[activeElement._datasetIndex].data[activeElement._index]; console.log(`Clicked on ${label}: ${value}`); } });
In this example, we create a new Chart object using the Chart.js library and add a click event listener to the canvas element of the chart. When a user clicks on a data point in the chart, the event listener will capture the click event and log the label and value of the clicked data point to the console.
This is just a simple example of how you can handle a chart click event in Node.js using Chart.js. You can customize the event handler to suit your specific needs and perform different actions based on the click event.
How to add legends to a chart in node.js with chart.js?
To add legends to a chart in Node.js using Chart.js, you can follow these steps:
- Install the Chart.js library in your project using npm: npm install chart.js
- Create a new Chart.js chart by including the following code in your Node.js application: const Chart = require('chart.js'); const chartOptions = { // Add your chart options here }; const data = { labels: ['January', 'February', 'March', 'April', 'May', 'June', 'July'], datasets: [ { label: 'Dataset 1', data: [10, 20, 30, 40, 50, 60, 70], borderColor: 'red', backgroundColor: 'transparent', }, // Add more datasets as needed ], }; const chart = new Chart(document.getElementById('myChart'), { type: 'line', data: data, options: chartOptions, });
- In the options object, you can customize the appearance and behavior of the chart, including adding legends. To add legends to the chart, you can include the following configuration in the options object: const chartOptions = { // Add other options here legend: { display: true, position: 'top', // 'top', 'left', 'bottom', 'right' }, };
- The legend object specifies the display and position of the legends in the chart. Set display to true to show legends and specify the position using the position property.
- Finally, create an HTML file to display the chart with the corresponding canvas element:
- Run your Node.js application to generate the chart with legends displayed based on the specified configuration.
That's it! You have successfully added legends to a chart in Node.js using Chart.js. Customize the legend appearance and position according to your requirements.
How to customize the appearance of a chart in node.js with chart.js?
To customize the appearance of a chart in Node.js with Chart.js, you can use various configuration options provided by Chart.js. Here is a guide on how to customize the appearance of a chart:
- Install Chart.js package using npm:
npm install chart.js
- Create a new Chart.js chart in your Node.js application:
const Chart = require('chart.js');
// Create a new chart instance const ctx = document.getElementById('myChart').getContext('2d'); const myChart = new Chart(ctx, { type: 'bar', data: { labels: ['Red', 'Blue', 'Yellow', 'Green', 'Purple', 'Orange'], datasets: [{ label: '# of Votes', data: [12, 19, 3, 5, 2, 3], backgroundColor: [ 'red', 'blue', 'yellow', 'green', 'purple', 'orange' ], borderColor: [ 'black', 'black', 'black', 'black', 'black', 'black' ], borderWidth: 1 }] } });
- Customize the appearance of the chart by modifying the configuration options:
- Change the chart type (e.g. bar, line, pie, etc.) by setting the type property in the chart configuration object.
- Customize the data labels, colors, and styles of the chart by modifying the labels, data, backgroundColor, borderColor, and borderWidth properties in the chart configuration object.
- Customize the appearance of the axes, tooltips, and legends by modifying the options property in the chart configuration object. You can set various options such as scales, tooltips, and legend to customize the appearance of the chart.
- Update the chart data dynamically by updating the data property in the chart configuration object and calling the update() method on the chart instance.
// Update chart data dynamically myChart.data.datasets[0].data = [10, 20, 5, 10, 15, 25]; myChart.update();
By following these steps, you can customize the appearance of a chart in Node.js with Chart.js according to your requirements. Feel free to explore more configuration options provided by Chart.js to create stunning and interactive charts.
What is a chart configuration object in chart.js and how is it created in node.js?
In chart.js, a chart configuration object is used to define all the settings and options for a specific chart, such as the type of chart (e.g. line, bar, pie), data values, colors, labels, axes, tooltips, and more.
To create a chart configuration object in Node.js, you would typically define it as a JavaScript object with key-value pairs representing the various settings and options. For example:
const chartConfig = { type: 'bar', data: { labels: ['January', 'February', 'March', 'April', 'May'], datasets: [ { label: 'Sales', data: [100, 200, 150, 300, 250], backgroundColor: 'rgba(255, 99, 132, 0.2)', borderColor: 'rgba(255, 99, 132, 1)', borderWidth: 1 } ] }, options: { scales: { y: { beginAtZero: true } } } };
This is just a basic example of a bar chart configuration object. You can customize it further by adding more options and settings as needed for your specific chart requirements. Once you have defined your chart configuration object, you can then pass it as an argument when creating a new chart instance in your Node.js application.