
Best Joomla Installation Tools to Buy in June 2026
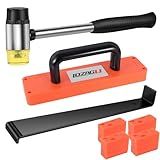
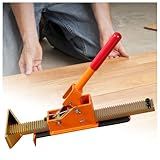
LOZAGU 43-Piece Laminate Flooring Tools, LVP installation kit, Vinyl Flooring Tools, Tapping Block with Handle, Spacers, Double-Faced Mallet and Pull Bar (43-PIECE)
- VIBE-ABSORBING GRIP & DOUBLE-FACED HEAD ENSURE PRECISION STRIKES.
- DURABLE STEEL PULL BAR WITH SOFT PADS PREVENTS FLOOR SCRATCHES.
- ERGONOMIC TAPPING BLOCK OFFERS VERSATILE, COMFORTABLE OPERATION.


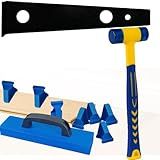
REXBETI Laminate Wood Flooring Installation Kit, LVP Installation Kit, Vinyl Flooring Tools - Tapping Block with Handle, Pull Bar, Double-Faced Mallet and Spacers
-
DOUBLE-FACED MALLET ABSORBS VIBRATION FOR A COMFORTABLE, PRECISE STRIKE.
-
PULL BAR'S PREMIUM A3 STEEL PROTECTS FLOORS WITH ENHANCED STRENGTH.
-
TAPPING BLOCK'S NEW DESIGN OFFERS STURDY, VERSATILE PLANKING SUPPORT.
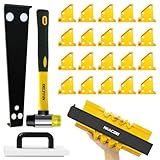
Laminate Flooring Tools, NAACOO LVP Installation Kit, Professional Vinyl Flooring Tools - Tapping Block with Handle, 10” Contour Gauge, Pull Bar, 2 in 1 Spacers, Double-Faced Mallet.
- EFFORTLESSLY INSTALL ODD-SHAPED FLOORS WITH OUR CONTOUR GAUGE KIT!
- TAPPING BLOCK WITH HANDLE PREVENTS HAND INJURY DURING FLOORING JOBS.
- VERSATILE SPACERS CREATE PRECISE GAPS FOR ANY WOOD FLOORING INSTALLATION.
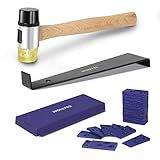
WORKPRO Laminate Wood Flooring Installation Kit with Reinforced Double-Faced Mallet, Heavy Duty Pull Bar, Tapping Block and 30-Piece Spacers Included,Multicolor
-
REINFORCED MALLET CREATES A POSITIVE STRIKE FOR FLAWLESS FLOORING.
-
ENHANCED PULL BAR OFFERS SUPERIOR STRENGTH AND FLOOR PROTECTION.
-
COMPLETE KIT ENSURES PERFECT INSTALLATION FOR ANY FLOORING TYPE.

Saker Laminate Flooring Tools, 65-Piece Wood Flooring Installation Kit with 60 Flooring Spacers,Tapping Block with Handle, Pull Bar, 10”Contour Gauge, Rubber Mallet, Tape Measure
- COMPLETE 7-IN-1 KIT ENSURES EFFICIENT FLOORING INSTALLATION.
- DURABLE TAPPING BLOCK PROTECTS HANDS AND ENHANCES CONTROL.
- PRECISE CONTOUR GAUGE SIMPLIFIES TEMPLATES FOR ANY SHAPE.
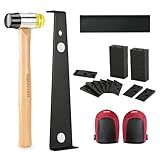
Goldblatt Laminate Wood Flooring Tools Installation Kit with 100 Spacers, Reinforced Double-Faced Mallet, Tapping Block, Heavy Duty Pull Bar, and Protective Knee Pads
- DURABLE, EASY-TO-USE TOOLS FOR EFFICIENT FLOORING INSTALLATION.
- ERGONOMIC DESIGN REDUCES FATIGUE FOR A MORE COMFORTABLE EXPERIENCE.
- COMPLETE KIT INCLUDES ESSENTIALS FOR HASSLE-FREE SETUP AND USE.
Hardwood Flooring Jack Positioning Tool - Laminate Flooring Installation Kit for Hardwood, Wood Floor, Plank, Board Installation
- R-TYPE PIN DESIGN PREVENTS TOOL LOSS FOR RELIABLE USE.
- EASY SPRING REPLACEMENT BOOSTS EFFICIENCY & WORKING TIME.
- FLOOR-FRIENDLY & WALL-SAFE: HASSLE-FREE INSTALLATION GUARANTEED!
Jiffy2NE1 LVP Installation Kit, Flooring Tools for Vinyl Plank/Hardwood/Laminate Installing, with 20Pcs LVP Spacers (1/4 & 1/2 inch), Heavy Duty Tapping Block, Pull Bar, Rubber Mallet
- ALL-IN-ONE KIT: FAST, PRECISE INSTALLS FROM CENTER TO WALLS.
- MALLET-FREE DESIGN: WORK EFFICIENTLY IN LARGE AREAS, NO HAMMER NEEDED.
- PRO RESULTS FOR ALL: PERFECT FOR DIYERS AND PROFESSIONALS ALIKE!
To install Joomla on Ubuntu, you can follow these steps:
- Before installing Joomla, make sure you have a web server installed on your Ubuntu system. Apache is a popular choice, so you can install it by running the command:
sudo apt-get install apache2
- Next, you need to install MySQL or MariaDB as the database server. You can install it by executing the following command:
sudo apt-get install mysql-server
During the installation, you will be prompted to set a password for the MySQL root user.
- Once the installation is complete, run the MySQL security script to improve the security of your database server:
sudo mysql_secure_installation
Follow the on-screen instructions to configure the security options.
- After securing MySQL, you need to install PHP along with some necessary extensions. Run the following command to install PHP and the required extensions:
sudo apt-get install php libapache2-mod-php php-mysql php-curl php-gd php-xml php-zip php-mbstring php-xmlrpc
- Once the installation is finished, restart Apache to apply the changes:
sudo systemctl restart apache2
- Now, you can proceed to download the Joomla package from the official website (https://www.joomla.org/download.html). Choose the latest stable version and download the ZIP file to your local machine.
- Extract the Joomla package and move the extracted files to the default Apache web root directory:
sudo mv ~/Downloads/Joomla_3.x.x-Stable-Full_Package/* /var/www/html/
Replace "3.x.x" with the actual version number of Joomla you downloaded.
- Set appropriate permissions for the Joomla files and folders:
sudo chown -R www-data:www-data /var/www/html/ sudo chmod -R 755 /var/www/html/
- Create a new database for Joomla using MySQL:
sudo mysql -u root -p
Enter your MySQL root password and execute the following SQL statements:
CREATE DATABASE joomla; GRANT ALL ON joomla.* TO 'joomlauser'@'localhost' IDENTIFIED BY 'password'; FLUSH PRIVILEGES; EXIT;
Replace "joomlauser" with your desired database username and "password" with a strong password.
- Open a web browser and navigate to your Ubuntu server's IP address or domain name. You will see the Joomla installation wizard. Follow the on-screen instructions, providing the necessary information such as database details and website settings.
- After completing the installation, remove the installation folder for security reasons:
sudo rm -rf /var/www/html/installation/
That's it! Joomla should now be installed and ready to use on your Ubuntu system.
What is the purpose of Joomla components on Ubuntu?
Joomla is a popular content management system (CMS) that allows users to build and manage websites easily. Joomla components are additional software modules or extensions that can be installed on a Joomla website to enhance its functionality and add new features.
On Ubuntu, the purpose of Joomla components remains the same as on any other operating system. These components are designed to extend the core features of Joomla and provide specific functionalities required by the website owner or administrator. Some common examples of Joomla components include:
- eCommerce components: These components enable the website to incorporate online shopping capabilities, such as product catalogs, shopping carts, and payment gateways.
- Forum and community components: These components allow the creation of discussion forums, social networking features, and community management tools.
- Media and content management components: These components facilitate the management and presentation of various types of media, such as images, videos, documents, and other rich content.
- SEO and analytics components: These components assist in optimizing the website for search engines and provide analytics and reporting tools to track website performance.
- Booking and reservation components: These components are useful for websites that require booking systems, event calendars, or reservation capabilities.
Installing Joomla components on Ubuntu follows a similar process as on other operating systems. The main benefit of using Ubuntu for hosting Joomla websites is its stability, security, and extensive software package repository that allows easy installation and management of various components.
What is the Joomla template directory in Ubuntu?
In Ubuntu, the Joomla template directory is typically located at:
/var/www/html/templates/
This directory contains the available Joomla templates that can be used for designing the website.
How to install MySQL on Ubuntu for Joomla?
To install MySQL on Ubuntu for Joomla, you can follow these steps:
- Open the Terminal by pressing Ctrl+Alt+T.
- Update the package list by running the following command: sudo apt update
- Install the MySQL server package by running the following command: sudo apt install mysql-server
- During the installation process, you will be prompted to set a password for the MySQL root user. Choose a strong password and remember it as you will need it later.
- Once the installation is complete, start the MySQL service by running the following command: sudo systemctl start mysql
- Check the status of the MySQL service to ensure it is running by running the following command: sudo systemctl status mysql If the service is running, you will see a message indicating that it is active.
- Enable the MySQL service to start on boot by running the following command: sudo systemctl enable mysql
- To secure your MySQL installation, it is recommended to run the MySQL Secure Installation script. Run the following command and follow the prompts: sudo mysql_secure_installation This script will prompt you to set a secure password policy, remove anonymous users, disallow remote root login, and remove the test database.
- Once MySQL is installed and secured, you can proceed to install Joomla. Make sure you have the necessary prerequisites installed (like Apache, PHP, etc.) before installing Joomla.
That's it! MySQL is now installed and ready to use with Joomla on your Ubuntu system.
How to create a new administrator account in Joomla on Ubuntu?
To create a new administrator account in Joomla on Ubuntu, follow these steps:
- Log in to your Joomla website using the existing administrator account credentials.
- Once logged in, go to the Joomla administration panel by adding "/administrator" to the URL of your website. For example, if your site is www.example.com, the administration URL would be www.example.com/administrator.
- In the Joomla administration panel, go to "Users" and then "User Manager".
- Click on the "New" button on the top right corner of the User Manager page.
- Fill in the required fields for the new administrator account. Enter a username, password, email, and any other relevant information.
- Under the "Basic Settings" tab, ensure that "User Group" is set to "Super Users" or another group with administrator privileges.
- Once you have provided all the necessary information, click on the "Save & Close" button.
- Now you have successfully created a new administrator account in Joomla on Ubuntu.
Note: It is important to ensure that the new administrator account has a secure password to prevent unauthorized access. Additionally, it is recommended to periodically change passwords for security purposes.
How to enable Joomla SEO-friendly URLs on Ubuntu?
To enable SEO-friendly URLs in Joomla on Ubuntu, you can follow these steps:
- Install Apache's rewrite module: Open the terminal and run the following command: sudo a2enmod rewrite
- Enable the use of .htaccess files: Open the default Apache configuration file by running the following command: sudo nano /etc/apache2/sites-available/000-default.conf
- Inside the block, look for the block that points to your Joomla site's directory. It should look like this:
- Inside the block, add the following lines to enable the usage of .htaccess files: AllowOverride All Save and close the file.
- Restart Apache for the changes to take effect: sudo service apache2 restart
- Log in to your Joomla administration dashboard and go to "System" -> "Global Configuration".
- In the "Site" tab, find the "SEO Settings" section and set "Search Engine Friendly URLs" to "Yes".
- If you want to remove the index.php from the URLs, locate the "Use URL Rewriting" option in the same "SEO Settings" section and set it to "Yes".
- Save the changes.
Your Joomla site should now have SEO-friendly URLs enabled.
How to secure a Joomla website on Ubuntu?
Securing a Joomla website on Ubuntu involves implementing several measures to protect the website and its data from unauthorized access or malicious attacks. Here are some steps to secure a Joomla website on Ubuntu:
- Keep Joomla and its extensions up to date: Regularly update both Joomla and its extensions with the latest security patches. Outdated software is often targeted by hackers.
- Secure Ubuntu server: Ensure that your Ubuntu server is secure by regularly installing security updates and patches. Use a strong, unique password for the server's root account and disable any unnecessary services or modules.
- Enable a firewall: Set up a firewall on your Ubuntu server to filter incoming traffic and allow only necessary services. Use the built-in firewall tool, UFW (Uncomplicated Firewall), to configure and manage the firewall rules.
- Use secure file permissions: Set the appropriate file permissions to restrict unauthorized access to your Joomla files. Generally, directories should have permissions set to 755, while files should be set to 644.
- Enable HTTPS: Secure your website by using HTTPS with an SSL/TLS certificate. Obtain a valid SSL certificate from a trusted certificate authority and configure your web server (e.g., Apache or Nginx) to redirect traffic to HTTPS.
- Change default database prefix: During the Joomla installation, change the default database table prefix from "jos_" to a unique value to prevent database-related attacks.
- Apply strong passwords: Use strong and complex passwords for all user accounts associated with your Joomla website. Implement a password policy that includes a mix of uppercase and lowercase letters, numbers, and special characters.
- Use two-factor authentication (2FA): Implement an additional layer of security by enabling 2FA for Joomla administrator accounts. This requires users to provide a second authentication factor, such as a code from a mobile app or a physical security key.
- Regularly backup website data: Create regular backups of your Joomla website and store them securely off-site. In case of a security breach or data loss, backups can help restore your website quickly.
- Use security extensions: Utilize security extensions like Akeeba Admin Tools or RSFirewall to strengthen the security of your Joomla website. These extensions provide additional features like intrusion detection, malware scanning, and protection against common attacks.
By implementing these measures, you can significantly improve the security of your Joomla website on Ubuntu. However, it's important to continuously monitor and update your security measures to adapt to evolving threats.
How to grant necessary permissions to Joomla files and directories on Ubuntu?
To grant necessary permissions to Joomla files and directories on Ubuntu, you can follow these steps:
- Open a terminal on your Ubuntu server.
- Navigate to the root directory of your Joomla installation using the cd command. For example, if your Joomla installation is located at /var/www/html, run the command: cd /var/www/html
- Set the owner of all files and directories to the web server user. By default, the web server user on Ubuntu is usually www-data. Run the following command to change ownership: sudo chown -R www-data:www-data .
- Grant read, write, and execute permissions to the web server user. Run the following command: sudo find . -type d -exec chmod 755 {} \; sudo find . -type f -exec chmod 644 {} \; This command sets directories to have permission 755 (read, write, execute for owner, read and execute for group and others) and files to have permission 644 (read and write for owner, read for group and others).
- Grant write permissions to specific folders and files that need to be modified by Joomla. Run the following command: sudo chmod 777 \ ./configuration.php \ ./images \ ./administrator/components \ ./components \ ./modules \ ./plugins \ ./templates Modify the list of folders and files as needed to fit your specific Joomla setup.
- Verify the permissions by running the following command: ls -l This command shows the current permissions of the Joomla files and directories. Make sure the permissions have been set correctly.
With these steps, you have granted necessary permissions to Joomla files and directories on Ubuntu.